Massachusetts Client Profile Setup Guide
Create a complete client profile before services begin to help ensure successful EVV compliance and reduce the need for manual visit corrections.
Before You Begin
Before creating a client profile, make sure you have:
-
The client's MassHealth Medicaid ID or AGE Consumer ID
-
The client's date of birth
-
The client's program information
-
The service(s) the client will receive
-
Authorization information (if your agency is responsible for creating authorizations)
Client Setup Overview
Complete these steps in order:
-
Create the client.
-
Assign the client's program.
-
Change the client status to Active.
-
Add at least one service.
-
Add an authorization (if required).
-
Create schedules (optional but recommended).
Why Complete Client Setup Before the First Visit?
Completing the client profile before services begin helps:
-
Make clock in and clock out easier for employees.
-
Automatically associate the correct Payer, Program, and Service with visits.
-
Reduce manual visit corrections.
-
Improve EVV compliance.
Step 1: Create the Client
-
Navigate to Clients > Client Management.
-
Select Create Client.
-
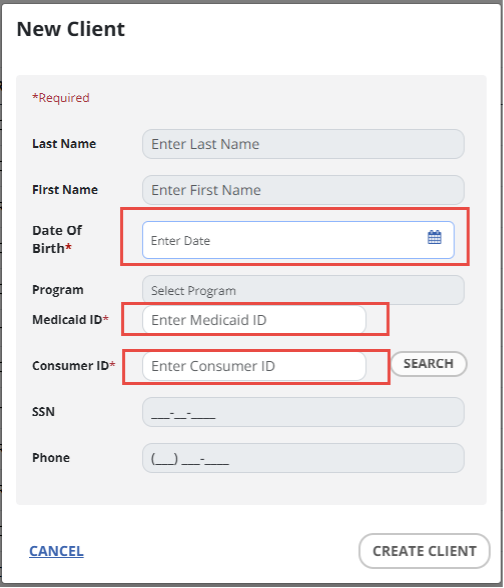
Search for the client using any of the following:
-
MassHealth Medicaid ID
-
AGE Consumer ID
-
Date of Birth
-
-
Select the correct client.
-
Select Create Client.
Expected Results
After the client is created, Sandata automatically imports:
-
Client name
-
Client ID
-
Date of Birth
-
Address
-
Phone number
-
Payer
The client is also created with:
-
Program: Default
-
Status: Pending
Find the Newly Created Client
Newly created clients are assigned a Pending status, so they do not appear in the default Client List. Use either of these methods to locate the client:
Filter the Client List:
-
Status: Pending
-
Program: Default
Search using either the client's:
-
MassHealth Medicaid ID
-
AGE Consumer ID
It's important to note that clients in Pending status can receive visits, but:
-
Payer and program are not automatically associated with the visit
-
Employees must manually select visit details
-
Manually editing a visit later makes the visit non-compliant
Best Practice: Complete the remaining client setup before employees begin providing services.
Step 2: Update the Client Program
Once the client has been created, assign the correct program.
-
Open the client profile.
-
Select the Program tab.
-
Select Change Payer.
Note: Although the button is labeled Change Payer, this workflow is used to assign the client's program.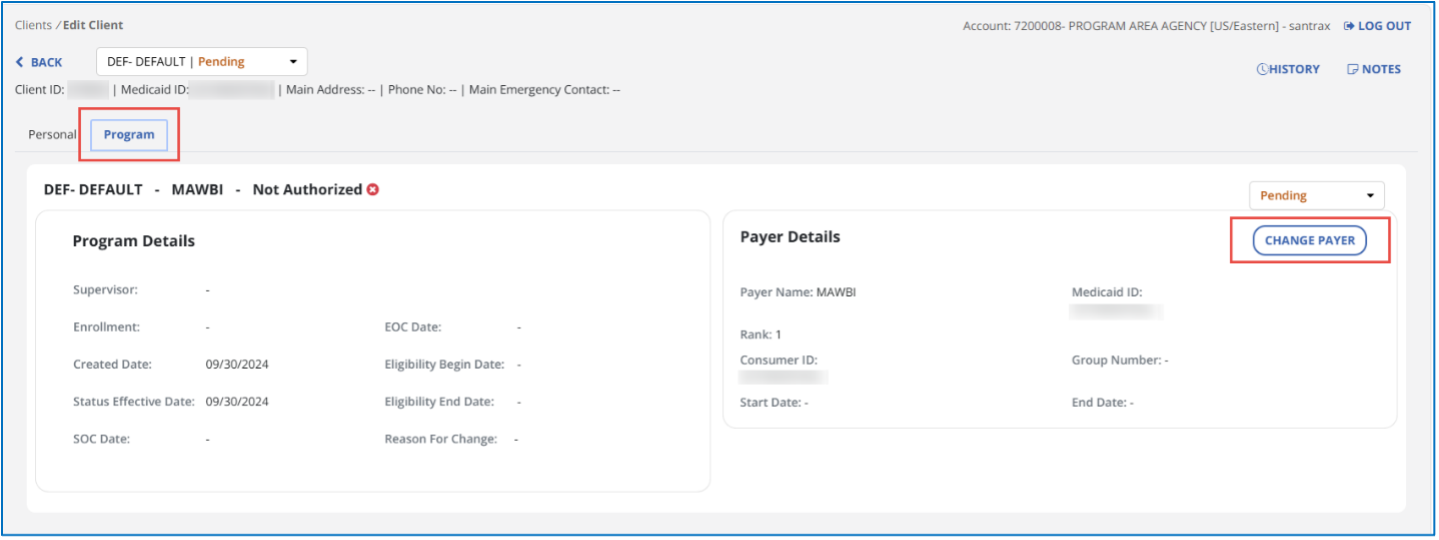
-
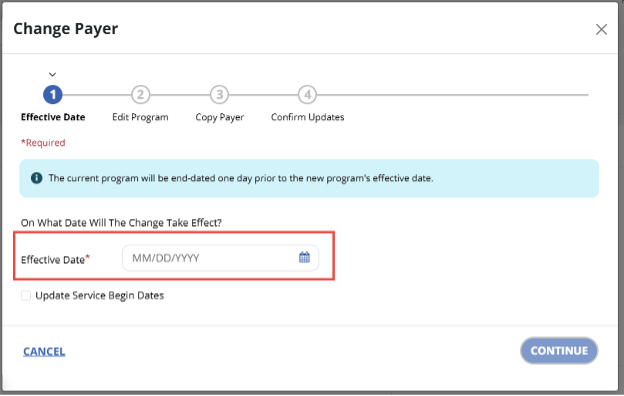
Set the Effective Date to the date the client started the program.
-
Select Continue.
-
Select the appropriate Program from the dropdown.
Note: Only programs that are valid for the client's payer and are in scope for EVV are displayed.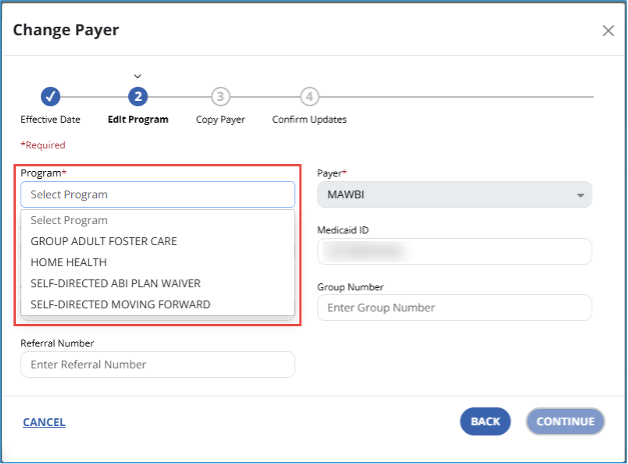
-
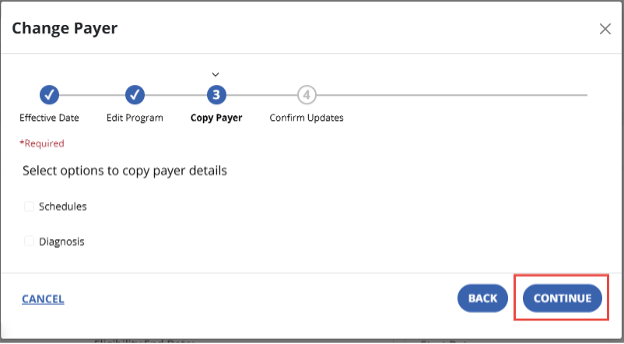
No action is required for on the Copy Payer screen.
-
Select Continue.
-
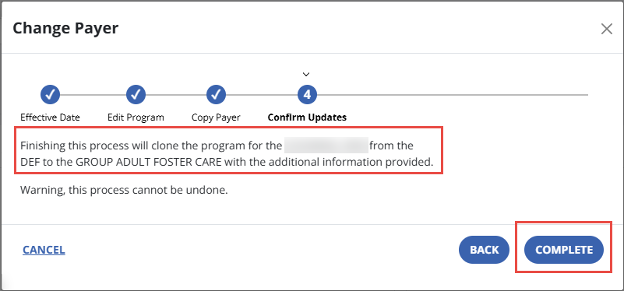
Review the selections and select Complete.
Expected Results
After the program is assigned:
-
The program appears next to the client's name.
-
The program appears in the profile header.
-
Service Details becomes available.
-
Authorization Details becomes available.
-
The client is now ready for service setup.
Step 3: Change Client Status from Pending to Active
After assigning the program, activate the client.
-
Open the Program tab.
-
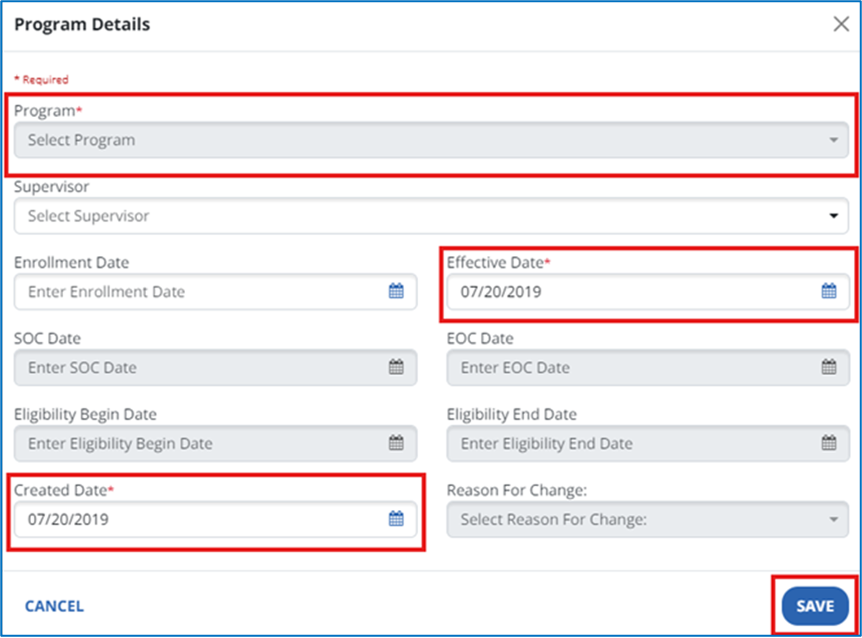
Change Status from Pending to Active.
-
Set both the Effective Date and Created Date to the client's Start of Care (SOC) date.
-
Select Save.
Why This Matters
Using the correct Start of Care date helps:
-
Prevent date-of-service conflicts
-
Ensure visits validate correctly for EVV
Expected Results
The client now appears as Active and is available in the default Client List.
Step 4: Add a Service
The client must have at least one service before authorizations or schedules can be created.
-
Open the Program tab.
-
In the Service Details section, select Add Service.
-
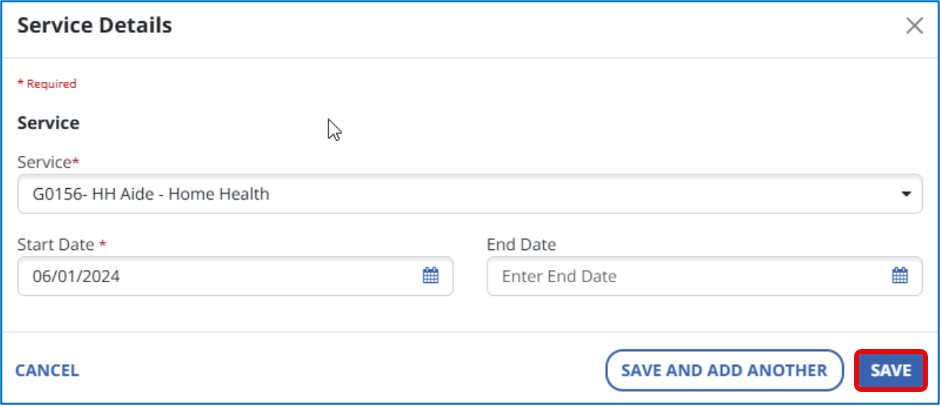
Select the appropriate service.
-
Select Save.
Why This Matters
Adding the correct service helps:
-
Employees select the correct service during visits
-
Ensure visits are associated with the appropriate EVV service
-
Reduce visit errors
Expected Results
The service appears in the Service Details section of the client profile.
Step 5: Add an Authorization
If your agency is responsible for managing authorizations, add an authorization after the client service has been created.
-
Open the client's Program tab.
-
In the Authorization Details section, select Add Authorization.
-
Complete the required fields.
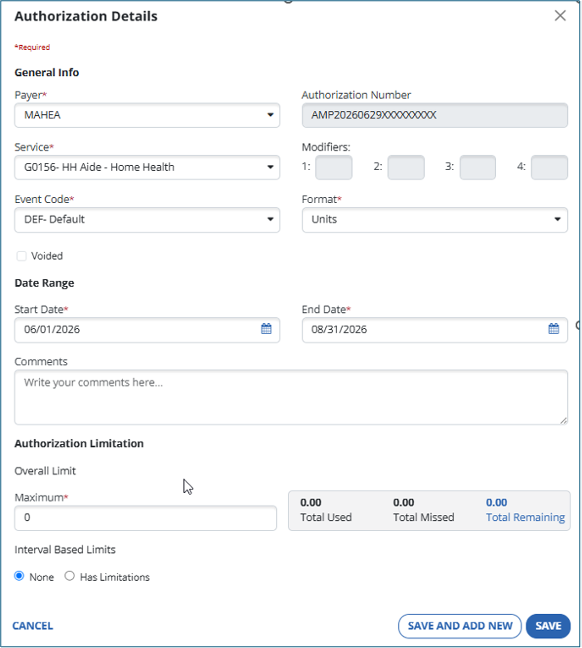
| Field | What to Enter |
|---|---|
| Payer | Select the payer associated with the authorization. |
| Service | Select the service included in the authorization. |
| Event Code | Select the service code modifier, if applicable. |
| Format | Select the measurement used by the payer for the authorization (for example, Units, Hours, or Visits). |
| Date Range | Enter the authorization start and end dates. |
| Maximum | Enter the total number of authorized units, hours, or visits for the authorization period. |
Example: How Format Affects Authorization Utilization
| If the Authorization Uses... | Maximum | A 3-Hour Visit Uses | Remaining Authorization |
|---|---|---|---|
| Units (15-minute increments) | 200 units | 12 units | 188 units |
| Hours | 200 hours | 3 hours | 197 hours |
Expected Results
The authorization appears in the Authorization Details section, and Sandata begins tracking authorization utilization as visits are completed.
Step 6: Create Schedules (Optional)
After the client profile is complete, you can create schedules, although it is not required in Massachusetts . When feasible, using schedules generates the following benefits:
-
Guides Employees: Schedules direct employees to the correct client, service, and visit, reducing guesswork at clock-in/out.
-
Reduces Errors: Schedules limit incorrect selections by predefining visit details.
-
Improves Data Accuracy: Scheduled visits ensure consistent and correct EVV data is captured automatically.
-
Supports Compliance: Schedules help ensure visits align with required EVV elements and authorized services.
-
Simplifies Daily Workflows: Schedules streamline the clock-in/out process, making visits quicker and easier for employees.
For instructions, see the Scheduling article.
If Your Agency Does Not Use Schedules
Employees can still capture visits using one of the following workflows.
Search Client
Employees search for the client using one of these identifiers:
-
Sandata Client ID
-
MassHealth Medicaid ID
-
AGE Consumer ID
For more information, see the Sandata Mobile Connect Clients Screen article.
Unknown Client
The Unknown Client workflow captures:
-
Caregiver
-
Visit date
-
Clock in and clock out times
-
GPS location
-
Service
However, it does not automatically associate:
-
Client
-
Payer
-
Program
As a result, visit maintenance is required before the visit reaches a Verified status. Any manual edits made to associate the client after the visit will make the visit non-compliant. For more information, see the Start Visit on Sandata Mobile Connect article.
Client Setup Checklist
Before employees begin providing services, confirm that the client profile is complete.
-
Client profile has been created.
-
The correct program has been assigned.
-
Client status is Active.
-
At least one service has been added.
-
An authorization has been added (if required).
-
A schedule has been created (recommended).