Manage Shifts
You can manually add, update and inactivate shifts as you create the weekly schedule.

Complete the following steps to add a shift:
-
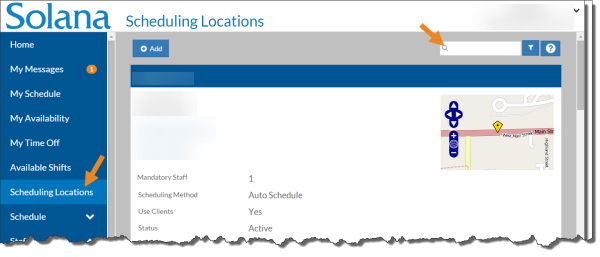
Select Scheduling Locations from the menu and then enter the name of the scheduling location in the Search field.
-
Select Schedule on the scheduling location card.

-
The schedule for the scheduling location opens. Click Add Shift or click on a cell in the calendar grid.

-
The Basic Information card of the shift opens.

Complete each field described below and click the Save button.
| Field | Enter: |
|---|---|
| Description | A description for the shift (First, Mornings, etc.). |
| Begin Date | The date of the shift. If you clicked in the calendar grid it defaults to that date. |
| Begin Time | The time the shift begins. If you clicked in the calendar grid it defaults to that begin time. |
| End Time | The time the shift ends. |
| Mandatory Staff | This defaults to the count set up for the scheduling location, but you can change it if needed. This is the minimum number of staff needed for this shift. |
| Service Type | The service type being provided during this shift. |
| Scheduling Method |
This defaults to the scheduling method for the scheduling location, but you can change it if needed.
|
| Schedule On-Call | If Schedule On-Call Shifts is turned on in Options, select Schedule On-Call if this is an On-Call Shift. On-Call hours do not count towards a staff's company absolute or preferred maximums and are not included in scheduled hours calculations. Staff can pick up on-call shifts even if they are already at their maximums. On-Call shifts appear on the Schedule in a lighter color and have a phone icon on them. The Scheduled Worked Time Does Not Match Logged Work Time, Scheduled Worked Time Location Does Not Match Logged Location, Not Clocked In Yet and Not Clocked Out Yet flags are not checked for On-Call Shifts. |
| Notes | Any notes related to this shift that you want to appear in the calendar and print-outs. |
The Scheduling Location Qualifications, Client Qualifications (read-only based on the clients selected), Clients (if the Include clients check box is selected in the scheduling location) and Slots cards appear with the scheduling location's defaults already selected.
If the scheduling location is set to include clients, as the Schedule Manager you can assign the clients to the shift that staff work at that scheduling location. By default when you create a new shift all the clients that are associated with the scheduling location are already selected, but you can add a guest client or remove one of the clients if the client won't be present or is working with different staff.
Complete the following steps to assign clients to a shift:
-
Select Scheduling Locations from the menu and then enter the name of the scheduling location in the Search field.
-
Select Schedule on the Scheduling Location card.
The schedule opens for the scheduling location.
-
Select the shift from the calendar grid.

The shift opens.
-
Select Add on the Clients card.
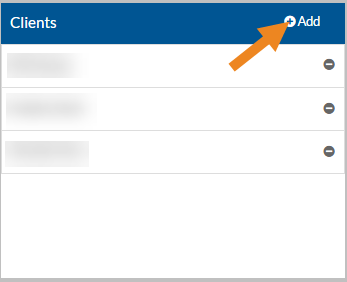
The Clients pop-up opens.
-
Select the client(s) you want to assign to the shift, then click the Save button.

-
Select the minus icon next to a client to remove it from the shift.

A confirmation message appears.
-
Select the Yes button.
The client no longer appears on the Clients card. If the client had any qualifications that other clients do not have, they disappear from the Client Qualifications card.
The Schedule Manager can assign staff to the slots in a shift. When assigning staff to a slot, a list of eligible staff appears.
Staff is eligible to fill a slot if they:
-
are active
-
are approved to work at the scheduling location
-
not excluded from working with any clients assigned to the shift
-
do not have approved time off at any point during the shift
-
are not already scheduled to work another shift that overlaps with the shift
Eligible staff are listed with a score next to their name. The higher the score, the better the match. The best matches for the shift appear at the top of the list. The score is calculated based on a point system. Staff start off with 100 points and points are deducted from their score for each item below that is missing. The number of points deducted for each item is set in Options. The most important criteria deduct the most points from the staff's score.
-
Hours for this shift do not exceed the company's absolute maximum for the day
-
Hours for this shift do not exceed the company's absolute maximum for the week
-
Hours for this shift do not exceed the company's preferred maximum for the day
-
Hours for this shift do not exceed the company's preferred maximum for the week
-
Hours for this shift do not exceed the employee's preferred maximum for the day
-
Hours for this shift do not exceed the employee's preferred maximum for the week
-
The scheduling location is a manager's preferred location for the staff
-
The scheduling location is the staff's preferred scheduling location
-
The staff's availability and exceptions allow for the staff to work this shift
-
The staff has the necessary qualifications to fulfill the missing qualifications for this shift. The number deducted is pro-rated based on the total number of qualifications needed and the number of qualifications the staff has.
Complete the following steps to assign, remove, or reassign staff to a slot:
-
Select Scheduling Locations from the menu and then enter the name of the scheduling location in the Search field.
-
Select the Schedule link on the Scheduling Location card.
The schedule opens for the scheduling location.
-
Select the shift from the calendar grid.
The shift opens.
-
Select the Assign button on the open Slot card.

The Staff pop-up opens.
-
Select the phone icon to view the staff's contact information.

If the staff marked the Allow Staff To See This Contact Information checkbox in Contact Information cards in User Settings, then the staff's phone number and/or email address appear.

-
Select the email address to automatically create an email to the selected email. Select the phone number to call the staff. Select the cell phone icon to text the staff. Select the phone icon again to hide the contact information.
-
Select the calendar icon to view the staff's schedule for the week that includes the current shift, (highlighted on the schedule and shown as pending).

The 24 Hr column shows the number of hours staff is scheduled to work in the adjacent 24 hour period.
The read-only calendar appears. Select the X to close the calendar.

The Total Scheduled Hours does not include the new shift (the striped yellow one(s).
-
Select the down arrowhead next to the staff's score to view additional information about the staff's score.

Select the up arrowhead to hide scoring information.
-
Select the Filters button, then mark/clear the appropriate checkboxes to narrow the list of staff by specific criteria, and then click the Done button.

-
Select the staff you want to fill the slot and then click the Save button.

The staff's name now appears on the Slot card. The O (open) icon disappears and the button changes to read Unassign.
The error flag indicating that the slot is open may not disappear until you exit the shift and open it again.
-
Select the Reassign button on a filled Slot card to remove the current assigned staff from the slot and reassign it.

The Staff card opens.
-
Select the staff you want to reassign the slot to and then click the Save button.

The new staff's name now appears on the Slot card.
-
Select the Unassign button on a filled Slot card to remove staff from the slot and leave the slot open. Unassign if the staff member had a time off request approved after the schedule was created, or if they no longer work at the agency.

A confirmation message appears.
-
Select the Yes button.

The staff's name disappears from the Slot card, the O (open) icon appears and the button changes to read Assign.
The error flag indicating that the slot is open may not appear until you exit the shift and open it again.
-
If the Call Off feature is turned on in Options, select the Call Off button on a filled Slot card to remove staff that has called off (via phone, email, etc. outside of Staff Scheduling), mark the staff as called off in the audit log for reporting purposes, and leave the slot open.

A confirmation message appears.
-
Select the Yes button.

The staff's name disappears from the Slot card, the O (open) icon appears and only the Assign button appears.
The error flag indicating the slot is open may not appear until you exit the shift and open it again.
If after copying a schedule or generating a schedule, there are shifts you don't need for that week, you can inactivate them so they no longer appear on the schedule.
Complete the following steps to inactivate a shift:
-
Select Scheduling Locations from the menu and then enter the name of the scheduling location in the Search field.
-
Select the Schedule link on the scheduling location card.
The schedule for the scheduling location opens.
-
Select the shift from the calendar grid.
The shift opens.
-
Select the Inactivate button.
A confirmation message appears.
-
Select the Yes button.
The Shift Inactivated toast appears and the inactivate shift disappears from the calendar grid.
If you turn on Show Inactive via the Filters icon, then the inactive shifts appears as solid white boxes on the calendar grid.
If Allow Reactivating Shifts is turned on in Options, and you accidentally inactivated a shift you can make it active again. To do so, select the inactive shift and then select Activate.
You can inactivate the shifts in the schedule for one or more scheduling locations. If the shifts are published already, unpublish them first.
Complete the following steps to inactivate all the shifts in a schedule:
-
Select the arrowhead next to Schedule, then select the arrowhead next to More in the menu pane.

-
Select Inactivate.
-
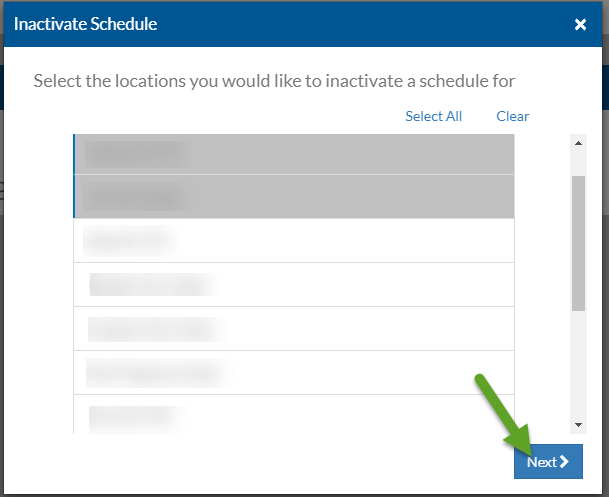
Select the scheduling location(s) that you want to inactivate shifts for and select the Next button.
-
Select the week you want to inactivate from the Week dropdown and select the Inactivate button.
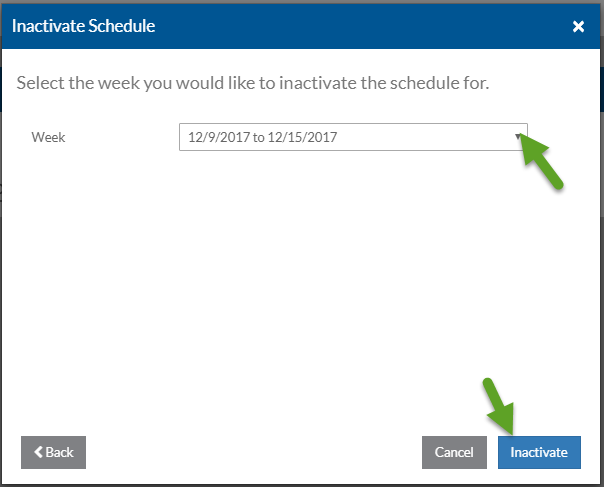
The shifts in the schedule for the selected locations and week are inactivated. A blue message appears when it finishes. You can now generate or copy shifts again.