Employees Add Time Slots to Shift Templates
Complete the following steps to add a time slot to a shift template:
-
Select Scheduling Locations from the menu and then enter the name of the scheduling location in the Search field.

-
Select the card of the scheduling location.

The scheduling location's card opens.
-
Select the Shift Templates option.

The Shift Templates window opens.
-
Select Add Time Slot or select a cell in the grid.

The Time Slot pop-up window opens.
-
Select the days of the week on which this shift occurs and select the Next button.

-
Select the appropriate Shift Template associated with this time slot, the begin and end time of the shift, as well as any related notes. The number of hours expected to be serving (Service Type 2 Hours ) is optional. Select the Save button.

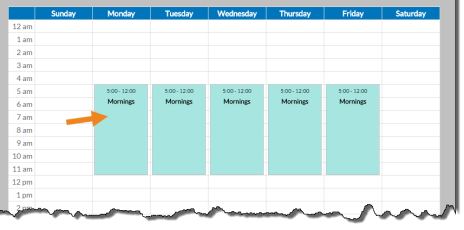
The time slots appear on the grid.
If the scheduling location's Schedule Method is From Source, you can assign the appropriate staff to each shift so that they are already assigned to slots when you generate the schedule.
-
Select the time slot on the grid. The Time Slot pop-up opens.
-
If the scheduling location's Weekly Cycle is not set to 1, then select or clear the check boxes for the correct week this shift should generate for and select the Save button.

-
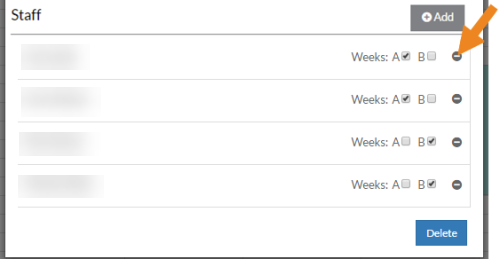
Select Add on the Staff card.

If the scheduling location's Weekly Cycle is not set to 1 and none of the Week checkboxes are selected, the Add option is disabled.
-
Select the staff you want to assign to this time slot and select the Save button.

-
If the scheduling location's Weekly Cycle is not set to "1," then select or clear the checkbox for the correct Weeks (A, B, C, etc.) next to each staff to indicate which week the staff is assigned to that shift.

-
Select the minus icon to remove the staff from the time slot completely.
A confirmation message appears.
-
Select the Yes button.
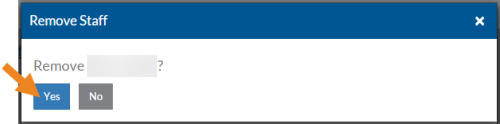
The staff disappears from the card.
-
Click the X to close the time slot. The names of the staff assigned to the slot appear in the time slot on the grid.
