Sandata EVV Billing (NV Only)

As of September 2025, the new Billing Dashboard is now live in the Sandata EVV Billing feature.
This dashboard provides a quick view of your account information under Billing. Learn about the new features in the Billing Dashboard on this page.
Here is a preview of the new look: Color coded cards, and new visuals to help you find information more quickly.

On the Dashboard page, the top navigation bar is designed to help you quickly jump into the various billing areas.

Here is where each section takes you:
-
Dashboard: Dashboard home screen
-
Payer Settings: Displays all the Payers configured in the system. More details can be found below.
-
Visits: The total of billing items that have not been added to a batch is displayed here
-
Batches: Allows the user to browse through the list of multi-Payer billing item batches that have been created
-
Claims: Displays the Claims page. The Claims grid is provided as quick access to any claim the agency has ever created, sent, or processed.
-
Claim Responses: This shows the incoming messages from Claims
-
Reports: This brings you to the Billing exports/reports window. From here, you can choose from Visits Reports or Claims Reports.
-
Transactions: Displays the inbound and outbound transactions
Payers Settings
The list of Payers that have been configured is listed under the Payer Settings tab.

Configure billing rules for the Payers by selecting the Payer and choosing the +Add Billing Rule option.

These rules you create help determine the billing date for this Payer. These are the areas you can configure:
-
Start date: select the calendar icon to select the start date from the calendar. You can use arrows to browse the calendar to display past and future dates.
-
Repeat Type: use the dropdown menu to select from Daily, Weekly, or Monthly
-
Every X days: type in the number of days the Payer should be billed or use up and down arrows to select the number of days. In this example, 7 was chosen.

-
End Rule: use the dropdown menu to schedule when this rule should end. You can choose from Never to keep the rule in place without an end date. On a certain Date, if you select this option, an end date box appears for you to enter the date. The last option is after a certain number of occurrences; a box appears to enter the occurrence number when this rule ends.
Be sure to select the Submit button to save the newly created billing rule.

This information is now displayed on the Dashboard for your quick reference.

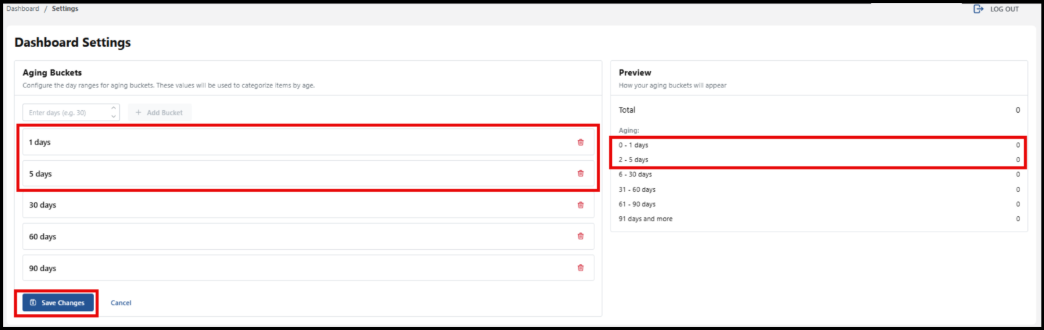
Dashboard Settings

Use the Dashboard settings to configure the day ranges for aging buckets.

You can customize by adding more day ranges. Enter the number of the day range you would like to see displayed or use the arrows to select the number of days. Then select, the Add Bucket button.

As you add buckets, a preview of the billing items in the day range appears. In this example, 1 day and 5 days have been added. Be sure to select the Save Changes button for any additional day ranges you add.
X12 File Upload
Use the Upload X12 File button to upload a remittance file to the system.

Date Range and Payer
You can select a date range and choose to only see information for a certain Payer or all Payers.

Dashboard Billing Tiles

Here is a summary of the Dashboard tiles:
-
Total Visits: Displays the total number of billable visits in your filtered range
-
Ready-to-Bill Visits: Number of visits ready for billing (no exceptions, not batched) within the selected filters
-
Visits with Billing Exceptions: Billable visits within the selected filters that have billing exceptions and are not in a batch
-
Unsubmitted Visits in Batches: These visits are in a batch but remain unsubmitted. This displays the number of batches awaiting claim submission
-
Rejected Claims: Claims rejected typically due to a technical issue
-
Total Inbound Files: Total number of transaction files in the system
-
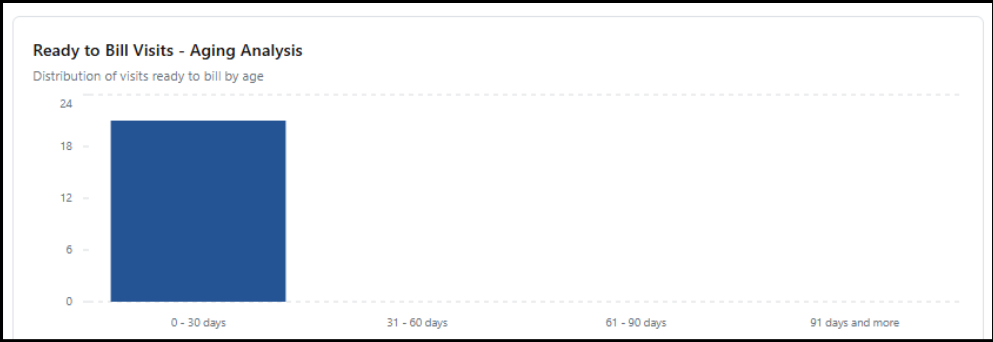
Ready to Bill Visits – Aging Analysis: Displays the number of visits ready to bill. This is according to the date range and Payer filters you have selected.
-
Overdue Claims: This chart, the number of claims with no Payer response after being submitted displays. They are displayed by how many days have passed. You can see this information by count or by dollar amount.

-
Claims By Status: This chart displays a view of all the current distribution of claims. It is categorized by processing status (Draft, Sent, To Review, Payment in Progress, Balanced, and Errored).

-
Ready to Bill Visits By Payer: In this area, you can view the number of visits ready to be billed (no exceptions, not a part of a batch) within the date range filter you selected. Use the dropdown menu to select a different Payer’s information to be displayed.

-
Upcoming Billing Days: Here you can view each Payer's next scheduled billing date and how many visits are currently ready to be billed for the visits (not in a batch and without exceptions) within the selected filters. Use the gear icon to set up billing days for each Payer.

This dashboard provides a quick view of your account information within the new Billing feature. Use it to guide your billing tasks.
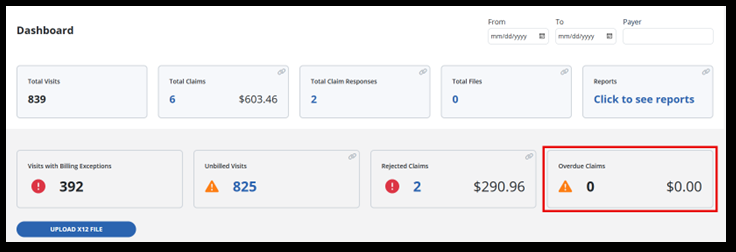
Access the Billing Dashboard under Billing > Dashboard. Here you can view tiles for the number of total visits, visits with exceptions, and overdue claims. You also have quick access to the total claims tile, total claim responses tile, unbilled visits and rejected claims tiles.

The areas on the dashboard are known as tiles. Some tiles are informational only and others provide helpful links to access each area.

-
The Total Visits tile is here for your information. It displays the total number of visits that have occurred in the period you searched for.

-
When you select the Total Claims tile, see all the claims in the period you have searched for display, and the dollar value of those claims.

-
The Total Claim Responses tile displays any messages pertaining to submitted claims.

-
The Reports tile links to available billing reports.

-
The Visits with Billing Exceptions tile displays the number of visits requiring resolution before they can be processed for billing.

-
Unbilled Visits displays the total number of visits yet to be billed. The Unbilled Visits tile is a great place to start your billing process. This takes you to the Visitspage.

-
Use the Rejected Claims tile to promptly address any issues. It links to the claims screen, displaying claims in the 'to-review' status.

-
The Overdue Claims tile shows the total number of claims along with their dollar value. These claims have not had a response in 30 days or more of the date range you have searched for.
-
Last on the billing dashboard is the Upload X12 File Button. If you receive a message back from claims processing, it might be an X12 file. You can upload the file here and create an invoice or batch from the dashboard.

In Sandata EVV, there are two types of exceptions that you may encounter, Visit Maintenance exceptions and Billing exceptions. Here is a quick video on how to view Billing exceptions.
All Visit Maintenance exceptions must be resolved. Once visits have a verified status, these visits appear in the Billingfeature. These visits can now be added to a batch to be processed for payment.
Here are a few examples of Visit Maintenance exceptions that need to be resolved. Remember, our goal is to ensure all visits are verified and free of exceptions.
| Visit Maintenance Exceptions | Description |
|---|---|
| Missing Client | There is no Client associated with the visit. |
| Missing Employee | There is no Employee record associated with the visit. |
| Missing Date of Service | The date of the service of the visit needs to be updated on the visit record. |
| Missing Time of Service | The time of the service of the visit needs to be updated on the visit record. |
| Missing Type of Service | There is no service on the visit |
Here are a few examples of Billing exceptions that need to be resolved.
| Billing Exceptions | Description |
|---|---|
| Client Date of Birth | There is no Date of Birth on the Client profile. Update the Client profile in Visit Maintenance. |
| No authorization match | The authorization information in the Client profile needs to be added or updated. |
| Missing Diagnosis code | The diagnosis code in the Client profile needs to be added. |
For Billing exceptions, many can be resolved in the Client profile, under the Programtab.
Creating an invoice to be billed is known as creating a batch. A batch is a group of verified visits that you bill for in the claims process.
-
Begin by going to the Billing feature and select Visits.

-
On the Visits page, select the date range to Sync visits to be added to a batch.

-
Use these filters to search for visits to add to a batch. As a note, a batch can include multiple Payers.

-
In the Billing Exceptions field, choose Visits without Exceptions. These visits are ready to be billed and are free of billing exceptions.

-
Now select visits by choosing the appropriate checkboxes. You can also use the select all checkbox next to Client Name.

-
If all things are correct, continue by selecting the Save Batch button.
This is the first step to get visits ready to submit as claims.

After visits have been added to a batch, the next step is submitting the batch for payment. The batch then becomes a claim.
To submit claims for payment:
-
Begin by navigating to the Billing feature and selecting Batches.

-
Find the batch where you want to make the claim. Open the batch by selecting the eye icon.

-
Open the Claims tab inside of the batch. The Refresh Batch button updates all visits and claims in the batch. The Refresh Draft Claims allows you to select claims you want to update if you don't want to recalculate everything.

-
Use the following filters to help sort the claim information and status.

Notice the number in parentheses (*). This refers to the number of claims related to that tab.
Here are the definitions of those terms:
Filters Function All View all claims that are in the batch Draft without exceptions Claims in draft form are not yet submitted Draft with exceptions Claims with billing exceptions in draft form not yet submitted Sent Claims that have been sent for payment Errored Claims that have been previously submitted but need to be revised before resubmitting To review Claims that need to be reviewed before re-submitting. There is an action that needs to be taken. Processed Claims that have been submitted for payment. The clearinghouse has received the claim. Balanced Claims that were paid Payment-in-progress Claims submitted awaiting payment. A message has been received back from the clearinghouse that the Payer has received the claim. -
Next, select the Draft without exceptions filter and select each visit that is to be billed in this batch. If all visits need to be billed, choose the checkbox to select all.

-
When ready to submit, select the Confirm & Send button.
-
Next, select the Transactions tab. This displays the results and status of the claim being processed. The status of the claim is listed as Processed, Errored, or In-Progress.

Claim Status Descriptions
Processed The claim was delivered to the Connect Center portal. The claim passed primary validation. Errored The claim was delivered to the Connect Center portal. The claim did not pass primary validation. In-Progress The system did not deliver the claim to Connect Center portal. This claim will be processed by the billing system after several seconds.
Run billing reports to help reconcile claims. This Billing feature has its own set of reports. Start on the Reports tile to see Claims and Visit reports to get started.
To create billing reports:
-
Go to the Billing Dashboard and select the Reports tile.

-
Two available reports from this tile are the Claims Report and the Visits Report. Use the eye icon to open the Reports View.

The Reports View has filters and a column selector to customize the reporting. Each report is as follows:
-
Visits Report
The Visits report includes the following columns for customization:
-
Client first name
-
Client last name
-
Service begin date
-
Service end date
-
Service
-
Payer
-
Status
-
Current claim status


-
-
Claims Report:
The claims report includes the following filter categories:
-
Unit Ptice
-
Quantity of Units
-
EVV Worker ID
-
Claim Status
-
Program Name
-
Total Billed
-
Type
-
Created Date
-
Service Begin Date
-
Service End Date
-
Period Start Date
-
Period End Date
-
Member ID
-
Revenue Code
-
Billed Amount
-
EVV Visit Key
-
Service Code
-
Agency Name
-
Claim Payor ID
-
Service Modifier


-
-
-
Next, select the filter categories and date range to generate the report.
-
Use the Export button to save. The report will open as an Excel file.

Billing remittance or 835 files for billing information can be added from the Billing Dashboard.
To upload remittance files:
-
Go to the Billing Dashboard found on the dropdown menu in the Billing feature.

-
Select the Upload X12 File button.

-
Locate the X12 file saved on your computer and select it to upload.

You will receive notification of the file uploading.

Here is an example of a claim response:

-
Claims that were matched will be marked on the Total Claim responses tile on the dashboard and should be updated with new matched responses (if any).

-
If you do not see any number on the Total Claim Responses tile, refresh the page. This will not duplicate or harm any claims.
This guide is used for processing denied claims effectively. The goal of resubmission is to resolve errors or discrepancies that cause a claim to be denied, ensuring accurate processing and reimbursement.
Resubmission is necessary when:
-
Essential information such as pre-certification IDs or procedural codes are incorrect or missing.
-
Claims exceed allowed units or plan limits.
-
Denials occur due to coding errors, lack of authorization, or eligibility issues.
During resubmission, it's crucial to:
-
Verify and correct any inaccurate or incomplete information.
-
Adjust unit counts or documentation to comply with payer guidelines.
-
Address specific denial reasons such as coding errors or lack of authorization promptly.
If a claim is denied, follow the steps below to resubmit:
-
Go to Billing and selecting Batches.

-
Select the eye icon to open the desired batch.

-
Locate the claim on the Claims tab which can be found inside of a batch.

-
Use the filter to sort for claims in To-Review status.

-
Find and select the claim you want to process again.
-
After reviewing the rejection, determine which claims need to be resubmitted.
Depending on the rejection reasons provided in the 835 file, address each issue. This may involve correcting errors in the original claim, providing additional documentation, or making adjustments as required.
-
Prepare resubmission data. Once the rejection issues are addressed, prepare the data for resubmission. This may involve creating new claim files or modifying existing claims to reflect the necessary changes.
Review the article on Creating a Batch for reference.
-
Next submit resubmissions. On the Claims tab choose a claim to resubmit, then select the Resubmit button.

-
The resubmit window will open. All fields are optional.

Fields are described below.
-
Status: select the correct status for this re-submission.
-
Original: the Payer did not receive the claim draft
-
Replacement: change was made to claim draft
-
Void: there was an issue with the claim amount, or the Payer has requested a different recoupment amount
-
-
Resubmission reason: enter the reason you are re-processing this claim.
-
ICN/PCN Selections: select this checkbox to use the original claim’s ICN number in the resubmitted X12 message. The ICN is the claim number in the payer system. You can find it in the payer portal. Use this if the Payer already has the claim in their system.
-
Payer Claim Number (ICN): enter a new ICN number here if you have not received a response from the Payer.
-
-
Select the Resubmit button to resubmit the claim.

A pop-up message now shows resubmitting process status.
-
On the Transactions tab, the claim will be found with the corresponding status. A new claim is now created and the original claim has changed to "Errored" status.

Here are the definitions of claim status terms:
Filters Function All all claims that are in the batch Draft without exceptions claims in draft form that are not yet submitted Draft with exceptions claims with billing exceptions in draft form not yet submitted Sent claims that have been sent for payment Errored claims that have been previously submitted but need to be revised before resubmitting To review claims that need to be reviewed before re-submitting; there is an action that needs to be taken Processed claims that have been submitted for payment and the clearinghouse has received the claim Balanced claims that were paid Payment-in-progress claims submitted awaiting payment; a message has been received from the clearinghouse that the payer has received the claim
The Health Records tab on a Client's profile displays any current or past diagnoses that have been assigned to them for treatment or service.
A diagnosis code is required for Billing. Codes beginning with a V, W, X, or Y are not billable.
To add or edit a Client's diagnosis code:
-
Find the Client and open their Client profile.
-
Select the Health Records tab.
-
Click the New Diagnosis button or click on an existing code to edit it.

-
Add or edit the diagnosis details.
If the exact diagnosis code is unknown, use the Select Diagnosis field to search for the code.
-
Enter all or part of the Code or Description.
-
Select the diagnosis code from the results list.

-
-
Select the Save button.

Once Physicians have been added within the Physician Management feature, one or more physicians can be added to a Client’s profile. To add a physician to a Client's health record:
-
Find the Client and open their Client profile.
-
Select the Add Physician option.
The Add Physician window opens.

-
In the Add Physician window, start typing to find a Physician that has been added in Physician Management.
-
Select the rank for primary Physician or other designation.
-
Select the Add button.
If the Physician is not found, select the Create New Physician button to add a new Physician to the system.

-
The Physician will appear as a card under the Client’s physicians.
-
You may add more Physicians to the Client’s profile. Use the 3-dot menu on the card to Edit or Delete.

Physicians can be added within the Physician Management feature to build a list of local medical practitioners, doctors, or specialists. To add a Physician:
-
Go to Clients and select Physician Management.
-
Select the Create Physician button.

-
Enter the personal and professional details in each field. First name, last name and NPI number are required. Select the Continue button.

-
Select the Add option to add the physician’s contact information.
-
Complete the fields in the Add Contact Detailswindow.
-
Select the Save button.

-
The Physician has been added to the system. You will be able to choose this Physician to add to a Client’s health records.
-
In Physician Management, you can select a name in the list of Physicians to edit their information at any time. Use the options menu to deactivate or delete.