Sandata Admin and Security
Use the following steps to manage user accounts, including users and user roles.

-
Go to the Modify User page under Security > Manage Users and search for a user.
-
Select the Edit icon
 for the user
-
Select the RESET PASSWORD button.
A temporary password is emailed to the user. The temporary password expires if it is not used to log into the system within a set period of time. When logging into the system using a temporary password, Users are prompted to create a new permanent password.

Users with the correct permissions can use the Change Password link to reset the password used to log into Sandata Aggregator.
To change a password:
-
Go to the Change Password page. (Security > Change Password)

-
Enter the current password in the OLD PASSWORD field.
-
Enter the new password in the NEW PASSWORD field.
-
Re-enter the new password in the CONFIRM PASSWORD field.
-
Select the SAVE button.
A notification of confirmation or error displays at the top of the screen.

The Security section allows users with the correct privileges to create and update new and existing Users. Using a combination of assignable privileges and customizable roles, access to the system and specific functionality can be defined and controlled. Sandata Aggregator also allows Users to create Access Groups which allow Users with appropriate privileges or roles to define custom groups with access to specific accounts, payers, programs and services. Security settings allow Users with appropriate system permissions to:
-
Change your own password.
-
Create and update Users and user roles.
-
Reset user passwords.
-
Lock/Unlock Users, which restricts or restores that Users access to the system.
-
Create user roles and assign security privileges to those roles. Assigning multiple roles grants Users the privileges assigned to each role.
-
Assign one or more roles to specific Users.
-
Assign individual security privileges to Users.
-
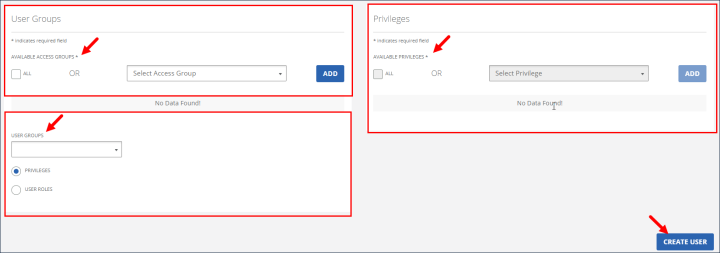
Go to the Manage Users page under Security > Manage Users > Create User.
To prevent duplicate user profiles, search to ensure there is not an existing profile before creating a new user profile.
-
Enter and confirm the new user’s email address, this is also the username for this user.
-
Enter the user’s Last Name and First Name.

-
Select ALL or individual ACCESS GROUPS.
-
Select the ADD button.
-
Select a user group (access group) and then select privileges or user roles.
Based on these choices the next section displays the privileges or user roles related to the user group (access group) for this user.
-
Select ALL or individual privileges or user roles.
It is best practice to assign user roles rather than individual privileges. This is because privileges may change over time and if changed must be updated for each user assigned that privilege. Updating a user role with a new privilege grants that privilege to every user assigned that user role, making it much easier to manage.
-
Select the ADD button.
-
Select the CREATE USER button.
Users can be deactivated on the Manage Users page. To deactivate users:
-
Go to the Manage Users page under Security > Manage Users.
-
Search for a user.
-
Select the Deactivate icon
 .
.
-
Select the DELETE button.

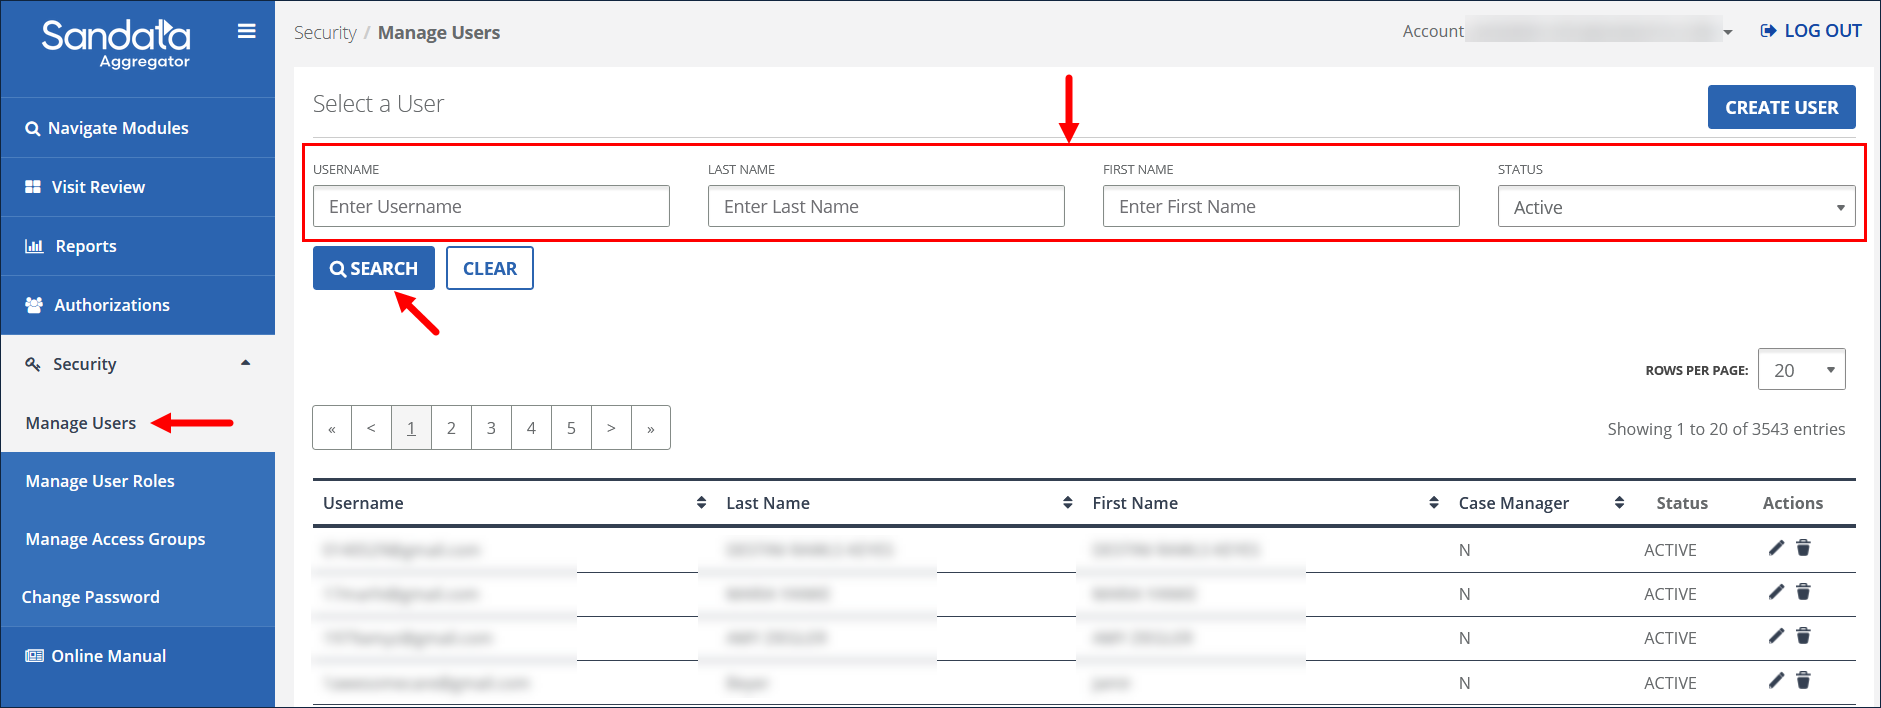
Use the Select a User section of the Manage Users page to search for existing users. To search for existing users:
-
Go to the Manage Users screen under Security > Manage Users.
-
Enter search criteria.
-
Select the SEARCH button.
-
Go to the Manage User's screen under Security > Manage Users > Search for the User > Edit User.
-
Make any changes to the user. You can change the user's name, access groups, user roles, or privileges.
-
Select the SAVE CHANGES button. A message displays to confirm the action.

User Roles allow users to create a group of system privileges combined into a single, assignable role. A User assigned a User Role is given all the privileges assigned to that role. Edits made to a User role affect all Users assigned that role.

The Manage User Roles page includes the following fields.
| Field | Description |
|---|---|
|
CREATE USER ROLE |
Button used to create a new user role |
| USER ROLE | User role name that is used to search |
|
ROLE NAME |
Name of the role |
|
ROLE DESCRIPTION |
Short description of what each role is used for |
Complete the following steps to create a User role.
-
Go to the Manage User Roles page under Security > Manage User Roles.
-
Select the CREATE USER ROLE button.

-
Enter the new role name.
-
Enter the new role description.

-
Select the ALL checkbox or select an access group from the dropdown menu.
-
Select the ADD button.
-
Select the ALL checkbox and ADD button to add all privileges or select an individual privilege to add one at a time .
-
Select the SAVE CHANGES button.

A message displays to confirm the action.

-
Go to the Manage User Roles page under Security > Manage User Roles.
-
Search for the user role, then select the Edit icon.
-
Make any changes to the User permissions, including changes to access groups and privileges.
-
Select the SAVE CHANGES button.

A message displays to confirm the action.
-
Go to the Manage User Roles page under Security > Manage User Roles.
-
Search for a User role.
-
Select the Deactivate icon
.
-
Select the DELETE button.

Although the pop-up mentions Delete, the user is only deactivated.