Sandata Agency Management 02-Client Profile Window
The Client Profile window contains all information related to a Client, including personal information, medical and admission details, contacts, payors, authorizations, and schedules.

The Overview section displays basic information about a Client including address, admission type, physician name and emergency contacts.

|
Field |
Description |
|---|---|
|
Personal |
Displays the Client’s name, phone number, current address and any additional relevant numbers or information. |
|
Admission and Other Dates |
Displays information about the Client’s admission and care dates. |
|
Admission Manager |
Displays information about the Client’s Admission Manager. |
|
Physician |
Displays information about the Client’s Physician. |
|
Referrer Contact |
Displays information about the Client’s referral contact. |
|
Contacts |
Displays information about any contacts associated with the Client. |
|
Current Certification |
Displays information about the Client’s current certification periodC |
|
Referral Source |
Displays information about where the Client was referred from. |
|
Directions |
Displays directions to the Client’s current address if needed. |
The Personal section allows users to edit any information specific to the Client. This includes a Client’s home address, a photograph, staff excluded from being assigned to the Client and specific attributes they may have such as languages spoken.

The Name area of the Personal section allows users to edit a Client’s basic information.

|
Field |
Description |
|---|---|
|
Title |
Use this drop down to select a Client’s title. |
|
First Name |
Use this field to edit the Client’s first name. |
|
Middle Initial |
Use this field to edit the Client’s middle initial. |
|
Last Name |
Use this field to edit the Client’s last name. |
|
Suffix |
Use this drop down to select a Client’s suffix. |
|
Birthdate |
Use this field to select the Client’s birthdate. |
|
SSN |
Use this field to edit the Client’s social security number. |
|
Marital |
Use this drop down to select the Client’s marital status. |
|
Gender |
Use this drop down to select the Client’s gender. |
|
Language |
Use this drop down to select the Client’s primary language. |
|
Ethnicity |
Use this drop down to select the Client’s ethnicity. |
|
Religion |
Use this drop down to select the Client’s religion. |
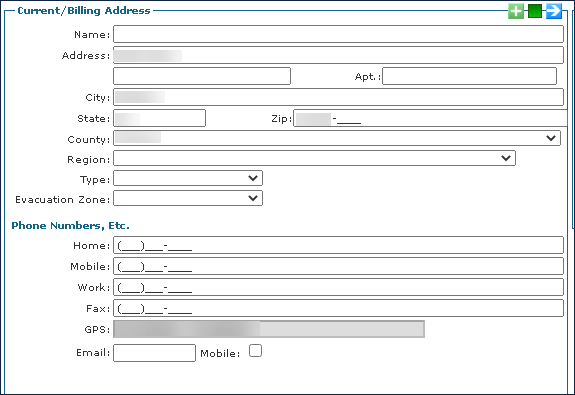
The Current Address area of the Personal section allows users to edit a Client’s residential information. Multiple addresses can be entered and stored for each Client.
|
Field |
Description |
|---|---|
|
Name |
Use this field to edit the Client’s name. |
|
Address |
Use this field to edit the Client’s street name and number. |
|
Apt |
Use this field to edit the Client’s apartment number. |
|
City |
Use this field to edit the Client’s city of residence. |
|
State |
Use this field to edit the Client’s state of residence. |
|
Zip |
Use this field to edit the Client’s zip code of residence. |
|
County |
Use this drop down to select the Client’s county of residence. |
|
Region |
Use this drop down to select the Client’s region of residence. |
|
Type |
Use this drop down to select the Client’s type of residence. |
|
Evacuation Zone |
Use this drop down to select the Client’s designated evacuation zone. |
|
Home |
Use this field to edit the Client’s home phone number. |
|
Mobile |
Use this field to edit the Client’s cell phone number. |
|
Work |
Use this field to edit the Client’s work phone number. |
|
Fax |
Use this field to edit the Client’s fax number. |
|
GPS |
Displays the GPS coordinates of the Client’s address. |
|
|
Use this field to edit the Client’s e-mail address. |
|
Mobile |
Select this checkbox to indicate that the Client’s cell phone number is their primary contact number. |
The Images area of the Personal section displays any pictures associated with the Client. This can be an identification picture, badge, or other associated image.

The Staff Excluded from Client area of the Personal section displays all the relevant information for Clients who should not be assigned to a particular staff member. This can be for a variety of reasons such as the staff member owns a pet that a Client is allergic to.

|
Field |
Description |
|---|---|
|
Staff Name |
Displays the staff member’s name. |
|
Agency ID |
Displays the Client’s alternate identification number. |
|
Exclusion Type |
Displays the exclusion type. A warning means that a Client/staff pairing can be overridden by an Administrator. A prevent means that a Client/staff pairing cannot be approved. |
|
Reason for Exclusion |
Displays the reason for the staff member’s exclusion. |
|
Start Date |
Displays the start date of the exclusion. |
|
End Date |
Displays the end date of the exclusion. |
The Exclusions window is used to select staff members to exclude from a Client.

|
Field |
Description |
|---|---|
|
Staff |
Use this dropdown to select a staff member to be excluded. |
|
Start Date |
Use this field to choose the start date of the exclusion. |
|
End Date |
Use this field to choose the end date of the exclusion. |
|
Agency ID |
Use this field to enter the staff member’s Agency ID. |
|
Exclusion Type |
Use this dropdown to choose a type of exclusion. |
|
Reasons for Exclusion |
Use this field to edit the reasoning for excluding the Client. |
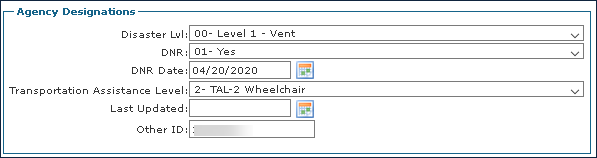
The Agency Designations area of the Personal section displays information related to the Client’s preferences for critical services, including DNRs and Transportation assistance.
|
Field |
Description |
|---|---|
|
Disaster Lvl |
Use this dropdown to indicate the Client’s priority level in case of a disaster. |
|
DNR |
Use this dropdown to indicate if the Client has a Do Not Resuscitate order. |
|
DNR Date |
Use this field to choose the date the DNR became effective. |
|
Transportation Assistance Level |
Use this dropdown to indicate at what level the Client may require transportation services. |
|
Last Updated |
Use this field to choose the date the transportation assistance level was last confirmed. |
|
Other ID |
Use this field to enter the Client’s agency assigned identification number. |
The Attributes area of the Personal section displays any special traits that the Client may have. These can range from spoken languages to religious affiliations or living in a particular area.

|
Field |
Description |
|---|---|
|
Name |
Displays the attribute name. |
|
Properties |
Displays the description of the attribute. |
|
Req |
Displays if the attribute is required. |
The Attribute Window is used to add an attribute to a Client.

|
Field |
Description |
|---|---|
|
Attribute |
Use this dropdown to select the attribute. |
|
Property |
Use this dropdown to select a category of the attribute. |
|
Values |
Use this field to add any extra information about the attribute. |
|
Task Note |
Click this button to open the task notes window associated with the attribute. |
|
Delete |
Click this button to delete the attribute. |
The Misc area of the Personal section details additional Client information that may need to be referenced.

|
Field |
Description |
|---|---|
|
CAHPS Opt Out |
Select this checkbox to indicate that the Client does not want their information shared outside of the agency. |
|
Other Notes / Comments |
Use this field to add any notes or comments that are relevant to the Client. |
The Contacts section contains the information for contacts associated with a Client. These range from emergency contact to spouse or family member, to other.

|
Field |
Description |
|---|---|
|
|
Displays the type of contact associated with the Client. |
|
Name |
Displays the name of the contact associated with the Client. |
|
Home Phone |
Displays the home phone number of the contact associated with the Client. |
|
Mobile Phone |
Displays the cell phone number of the contact associated with the Client. |
|
Work Phone |
Displays the work phone number of the contact associated with the Client. |
The Contacts Window is used to add a contact to an associated Client.

|
Field |
Description |
|---|---|
|
Title |
Use this dropdown to select the contact’s title. |
|
First Name |
Use this field to enter the contact’s first name. |
|
Middle Initial |
Use this field to enter the contact’s middle initial. |
|
Last Name |
Use this field to enter the contact’s last name. |
|
Suffix |
Use this dropdown to select the contact’s suffix. |
|
Type |
Use this dropdown to select the contact’s category. |
|
Relation |
Use this dropdown to select the contact’s relation to the Client. |
|
Name |
Use this field to enter the contact’s name. |
|
Address |
Use this field to enter the contact’s street name and number. |
|
Apt |
Use this field to enter the contact’s apartment number. |
|
City |
Use this field to enter the contact’s city. |
|
State |
Use this field to enter the contact’s state. |
|
Zip |
Use this field to enter the contact’s zip. |
|
County |
Use this field to enter the contact’s county. |
|
Type |
Use this dropdown to select the category of residence. |
|
Evacuation Zone |
Use this dropdown to select the contact’s designated evacuation zone. |
|
Home |
Use this field to enter the contact’s home phone number. |
|
Mobile |
Use this field to enter the contact’s cell phone number. |
|
Work |
Use this field to enter the contact’s work phone number. |
|
Fax |
Use this field to enter the contact’s fax number. |
|
|
Use this field to enter the contact’s e-mail address. |
|
Mobile |
Select this checkbox to indicate that the contact’s cell phone number is their primary number. |
The Medical section of the Client Profile window contains additional instructions for Client care when performing a visit or service.

The Allergies area of the Medical section contains details about client allergies that a staff member may need to be aware of when performing a visit.

The Allergies Template window contains all previously entered allergies that can be added to the Medical section of the Client Profile window.

The Durable Medical Equipment (DME) and Supplies area of the Medical section contains details about Client equipment that a staff member may need when performing a visit.

The DME Template window contains all previously entered equipment that can be added to the Medical section of the Client Profile.

The Nutritional Requirements area of the Medical section contains details about a Client’s diet that a staff member may need to be aware of when performing a visit.

The Nutritional Requirements Template window contains all previously entered nutritional requirements that can be added to the Medical section of the Client Profile.

The Safety Measures area of the Medical section contains details for a staff member to be aware of to protect the Client when performing a visit.

The Safety Measures Template window contains all previously entered safety measures that can be added to the Medical section of the Client Profile.

The Advanced Directives area of the Medical section contains instructions for a staff member to follow when performing a visit.

The Advanced Directives Template window contains all previously entered directives that can be added to the Medical section of the Client Profile.

The Medications section contains all medicines from the system that have been added to a Client’s admission for quick referencing.

|
Field |
Description |
|---|---|
|
Name |
Displays the name of the medicine. |
|
Properties |
Displays any specified traits of the medicine. |
|
Began |
Displays the date that the medicine can begin being given. |
|
Ended |
Displays the date that the medicine should be stopped. |
The Medication window is used to add a medication to a Client’s admission.

|
Field |
Description |
|---|---|
|
Name |
Use this dropdown to select the medicine name. |
|
Strength |
Use this dropdown to select the strength of the dosage. |
|
Dosage |
Use this field and dropdown to select how much and how often the medicine is given. |
|
Route |
Use this dropdown to select the method of administering the medicine. |
|
Frequency |
Use this field to enter any notes or warnings about the frequency of the medicine. |
|
PRN |
Select this checkbox to indicate the medicine is to be used as needed. |
|
Comments |
Use this field to enter any comments about the medicine. |
|
Classification |
Use this dropdown to select the category of the medicine. |
|
Began |
Use this field to select the starting date that the medication was given. |
|
Ends |
Use this field to select the last date that the medicine should be given. |
The Documents section contains information about the Client’s associated ARIES documentation.

|
Field |
Description |
|---|---|
|
Name |
Displays the name of the document. |
|
% |
Displays the percentage of the document that has been completed. |
|
Status |
Displays the status of the document. |
|
Signed |
Displays if the document was electronically signed. |
|
Created |
Displays the date the document was created. |
The Document Selector window is used to select ARIES documentation to be added to a Client’s admission.

|
Field |
Description |
|---|---|
|
Name |
Use this field to select which type of document to attach to the Client Profile. |
The Directions section contains GPS and directional information for navigating to a client’s primary address.

|
Field |
Description |
|---|---|
|
Directions |
Displays any notes or written directions to the Client’s primary address. |
|
Google Maps |
Click this button for the Google Maps view of the Client’s primary address. |
|
Google Directions |
Click this button for the Google Directions list to the Client’s primary address. |
The General section contains information related to the Client’s place of admission, services being received, authorizations and more.

The Admission Ties and Dates area of the General section contains information about the client’s admission including care dates and company information.

|
Field |
Description |
|---|---|
|
Company |
Displays the name of the company the Client was admitted to. |
|
Location |
Displays the location that the Client was admitted to. |
|
ROC |
Use this field to change the Client’s resumption of care date. |
|
SOC |
Use this field to change the Client’s start of care date. |
|
EOC |
Use this field to change the Client’s end of care date. |
The Managers/Etc. area of the General section contains information about the staff assigned to assist the Client.

|
Field |
Description |
|---|---|
|
Staff Manager |
Displays the name of the Staff Manager. |
|
Clinical Manager |
Use this dropdown to select the Clinical Manager assigned to the Client. |
|
Coordinator |
Use this dropdown to select the Coordinator assigned to the Client. |
|
MRN # |
Use this field to enter the Client’s medical record number. |
|
Marketer |
Use this dropdown to select the Marketer assigned to the Client. |
|
Team |
Use this dropdown to select the team the Client is assigned to. |
|
Admit Type |
Click this button to change the Client’s admission type. |
The Admission Status area of the General section contains information and dates related to the Client’s admission.

The Admission Source area of the General section contains information related to where the Client was admitted from.

The Services area of the General section contains information related to which services the Client is receiving, when they began and for how long they are being received.

|
Field |
Description |
|---|---|
|
Code |
Displays the service code. |
|
Description |
Displays the service description. |
|
Began |
Displays the service begin date. |
|
Ended |
Displays the service end date. |
|
Clinical Integration |
Displays the clinical indicator. The Clinical Indicator allows users to choose whether Santrax Agency Management or SPoC controls schedules for the selected service. |
|
Effective Date |
The effective date of the clinical integration. |
|
Case Seq # |
Displays the case sequence number. |
The Add a Service window is used to add a service to the Client Profile.

|
Field |
Description |
|---|---|
|
Service |
Use this dropdown to select the service to be added. |
|
Began |
Use this field to select the date that service began. |
|
Ended |
Use this field to select the date that service ended or will end. |
|
Case Seq # |
Use this field to enter the case sequence number. |
The Pay Source area of the General section contains information related to how the Client is providing compensation for services.

The Referral Source area of the General section contains information about where the Client was referred from.

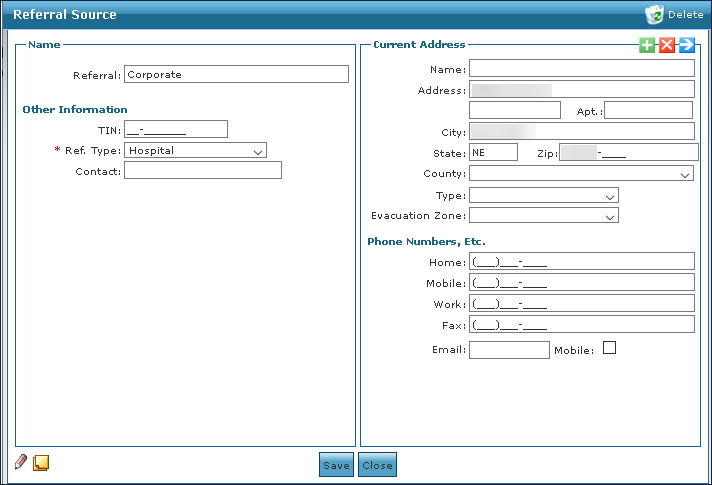
The Referral Source Window is used to add a new referral source that can be selected in the client’s admission.
|
Field |
Description |
|---|---|
|
Referral |
Use this field to enter the title of the referrer. |
|
TIN |
Use this field to enter the referrer’s tax identification number. |
|
Ref. Type |
Use this drop down to select the type of reference. |
|
Contact |
Use this field to enter the name of a contact person if referring from an office. |
|
Name |
Use this field to enter the referrer’s name. |
|
Address |
Use this field to enter the referrer’s address. |
|
Apt |
Use this field to enter the referrer’s apartment number. |
|
City |
Use this field to enter the referrer’s city. |
|
State |
Use this field to enter the referrer’s state. |
|
Zip |
Use this field to enter the referrer’s zip code. |
|
County |
Use this field to enter the referrer’s county. |
|
Type |
Use this drop down to select the type of address. |
|
Evacuation Zone |
Use this drop down to select the referrer’s designated evacuation zone. |
|
Home |
Use this field to enter the referrer’s home phone number. |
|
Mobile |
Use this field to enter the referrer’s mobile phone number. |
|
Work |
Use this field to enter the referrer’s work phone number. |
|
Fax |
Use this field to enter the referrer’s fax number. |
|
|
Use this field to enter the referrer’s e-mail address. |
|
Mobile |
Select this checkbox to indicate if the referrer’s mobile number is their primary number. |
The Physicians area of the General section contains the names and contact information of Physicians assigned to the Client.

|
Field |
Description |
|---|---|
|
Primary |
Use this dropdown to select the primary Physician. |
|
Secondary |
Use this dropdown to select the secondary Physician. |
|
Certifying |
Use this dropdown to select the certifying Physician. |
|
Ordering |
Use this dropdown to select the ordering Physician. |
The Add Physician window is used to create a new Physician entry that can be added to the Client’s admission.

|
Field |
Description |
|---|---|
|
Title |
Use this dropdown to select the Physician’s title. |
|
First Name |
Use this field to enter the Physician’s first name. |
|
Middle Initial |
Use this field to enter the Physician’s middle initial. |
|
Last Name |
Use this field to enter the Physician’s last name. |
|
Suffix |
Use this dropdown to select the Physician’s suffix. |
|
Org / Group |
Use this field to enter the Physician’s organization or group. |
|
License |
Use this field to enter the Physician’s license number. |
|
Expires |
Use this field to select the date the Physician’s license expires. |
|
UPIN |
Use this field to enter the Physician’s unique Physician identification number. |
|
API |
Use this field to enter the Physician’s application program interface number. |
|
NPI |
Use this field to enter the Physician’s national provider identification number. |
|
Active |
Select this checkbox to indicate that the physician is active. |
|
Name |
Use this field to enter the Physician’s name. |
|
Address |
Use this field to enter the Physician’s street name and number. |
|
Apt |
Use this field to enter the Physician’s apartment number. |
|
City |
Use this field to enter the Physician’s city. |
|
State |
Use this field to enter the Physician’s state. |
|
Zip |
Use this field to enter the Physician’s zip. |
|
County |
Use this field to enter the Physician’s county. |
|
Type |
Use this dropdown to select the category of residence. |
|
Evacuation Zone |
Use this dropdown to select the Physician’s designated evacuation zone. |
|
Home |
Use this field to enter the Physician’s home phone number. |
|
Mobile |
Use this field to enter the Physician’s cell phone number. |
|
Work |
Use this field to enter the Physician’s work phone number. |
|
Fax |
Use this field to enter the Physician’s fax number. |
|
|
Use this field to enter the Physician’s e-mail address. |
|
Mobile |
Select this checkbox to indicate that the Physician’s cell phone number is their primary number. |
|
This is a Clinic |
Select this checkbox to indicate that the Physician’s address is a clinic or office. |
The Payors area of the General section contains information about the Client’s Payors and billing information.

|
Field |
Description |
|---|---|
|
_ (Number) |
Displays the ranking of the Client’s Payor. |
|
Payor |
Displays the name of the Client’s Payor. |
|
Customer No. |
Displays the Client’s customer number. |
The Payor Information Window is used to add new Payer information to a Client’s admission.

The General area of the Payor Information window contains basic information about the Payer including billing orders and rate plans.

|
Field |
Description |
|---|---|
|
Payor |
Use this dropdown to select the Payer. |
|
Rate Plan |
Use this dropdown to select the Payer’s rate plan. |
|
Rank |
Use this dropdown to select the Payer’s ranking in the Client’s Payer list. |
|
Send Bill To |
Use this dropdown to select the Physician or office to send the invoice to. For private pay, this can be a family member or other contact. |
|
Percent |
Use this field to select the percentage of an invoice to bill to this Payer. |
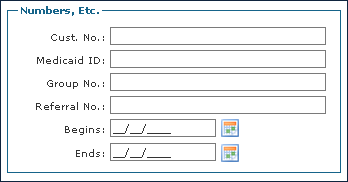
The Numbers, Etc. area of the Payor Information window contains identification information relevant to the Payer for invoicing the Client.
|
Field |
Description |
|---|---|
|
Cust. No. |
Use this field to enter the Client’s customer number. |
|
Medicaid ID |
Use this field to enter the Client’s Medicaid identification number. |
|
Group No |
Use this field to enter the Client’s group number. |
|
Referral No |
Use this field to enter the Client’s referral number. |
|
Begins |
Use this field to select the date the Payer admission begins. |
|
Ends |
Use this field to select the date the Payer admission ends. |
The Options area of the Payor Information window contains additional selections that can be made to indicate specific ways invoicing should be handled when billing the Client.

|
Field |
Description |
|---|---|
|
Capped Rates Transition to Next Payor |
Select this checkbox to indicate that when the Client reaches their rate cap, the remaining balance transfers to the next Payer. |
|
Suppress in Electronic File |
Select this checkbox to prevent the Payer from being included in the electronic file of the primary Payer. |
|
Responsible for Copay |
Select this checkbox to indicate the Client is responsible for the copay. |
|
Requires Pre-Denial |
Select this checkbox to indicate that this Payer must be billed for denial prior to billing the Payer that the agency will receive payment from. |
|
MSP Type |
Use this dropdown to select the Client’s Medicare Secondary Payer. |
The Billing Rates tab on the Payor Information window contains details about the rates associated with a service a Client is receiving that is being covered by the Payer.

|
Field |
Description |
|---|---|
|
Service |
Use this dropdown to filter the billing rates by service. |
|
Event Code |
Use this dropdown to filter the billing rates by event code. |
|
Type |
Use this dropdown to filter the billing rates by type. |
|
Active |
Select this checkbox to filter the billing rates by active status. |
|
Service |
Use this dropdown to select the service. |
|
Event |
Use this dropdown to select the event code. |
|
Shift |
Use this dropdown to select the shift. |
|
PSC |
Use this field to enter the place of service code. |
|
TSC |
Use this field to enter the type of service code. |
|
RevCode |
Use this field to enter the revenue code. |
|
HCPCS |
Use this field to enter the Healthcare Common Procedure Coding System code. |
|
Misc |
Use this field to enter the miscellaneous code. |
|
Modifiers |
Use this field to enter the modifier code. |
|
Type |
Use this dropdown to select the type of service. |
|
Week Rate |
Use this field to enter the week rate. |
|
Weekend Modifiers |
Use this field to enter the weekend modifier rate. |
|
Weekend Rate |
Use this field to enter the weekend rate. |
|
Holiday Rate |
Use this field to enter the holiday date. |
|
Overtime Billing |
Use this field to enter the overtime rate. |
|
Contract Type |
Use this dropdown to select the contract type. |
|
Contract Amount |
Use this field to enter the contract amount. |
|
Cap |
Use this field to enter the amount cap. |
|
Rank |
Use this dropdown to select the service rank. |
|
Effective Date |
Use this field to select the effective date of the service. |
The Copay Rates tab on the Payor Information window contains details about the rates associated with the copay for a service the Client is receiving.

|
Field |
Description |
|---|---|
|
Service |
Use this dropdown to filter the copay rates by service. |
|
Event Code |
Use this dropdown to filter the copay rates by event code. |
|
Type |
Use this dropdown to filter the copay rates by type. |
|
Active |
Select this checkbox to filter the copay results by active status. |
|
Service |
Use this dropdown to select the service. |
|
Event |
Use this dropdown to select the event code. |
|
Type |
Use this dropdown to select the type of service. |
|
Amount |
Use this field to enter the copay rate amount. |
|
Percent |
Use this field to enter the percentage of the service that the copay covers. |
|
Effective Date |
Use this field to select the effective date of the copay rate for the service. |
The Payroll Rates tab on the Payor Information window contains details about the pay rates associated with a specific Client.

|
Field |
Description |
|---|---|
|
Service |
Use this dropdown to filter the payroll rates by service. |
|
Event Code |
Use this dropdown to filter the payroll rates by event code. |
|
Type |
Use this dropdown to filter the payroll rates by type. |
|
Active |
Select this checkbox to filter the payroll rates by active status. |
|
Service |
Use this dropdown to select the service. |
|
Event |
Use this dropdown to select the event code. |
|
Staff |
Use this field to select the Staff Member. The Staff Member selected is provided the given rate. |
|
Shift |
Use this dropdown to select the shift. |
|
Type |
Use this dropdown to select the type of service. |
|
Week Rate |
Use this field to enter the week rate. |
|
Weekend Rate |
Use this field to enter the weekend rate. |
|
Cap |
Use this field to enter the amount cap. |
|
Rank |
Use this drop down to select the service rank. |
|
Effective Date |
Use this field to select the effective date of the service. |
The Authorizations tab on the Payor Information window contains details about the authorizations associated with the services the client is receiving.

|
Field |
Description |
|---|---|
|
Hide Outdated Auths |
Select this checkbox to remove outdated authorizations from the authorizations list. |
|
Hide Voided Auths |
Select this checkbox to remove voided authorizations from the authorizations list. |
|
Service |
Displays the service code of the authorization. |
|
Ref no. |
Displays the reference number of the authorization. |
|
Format |
Displays the billing format of the authorization. |
|
Max |
Displays the maximum hours of service for the authorization. A zero indicates that there is no limit on the service. |
|
Begin |
Displays the beginning date of the authorization. |
|
End |
Displays the ending date of the authorization. |
The Misc area of the General section contains details about live in assistance and other miscellaneous information associated with the Client.

|
Field |
Description |
|---|---|
|
Live In |
Select this checkbox to indicate a Client requires a live-in aide. |
|
Cluster |
Select this checkbox to indicate three or more Clients are being seen together. |
|
Mutual |
Select this checkbox to indicate that two Clients are being seen at the same time. When selected, the Client box opens, and the second Client can be selected. This should be done on both Client profiles. |
|
Equiv |
Use this field to enter the equivalent hours of service a Client can receive in a week from their live-in aide. |
|
Group # |
Use this field to enter any additional identification numbers. |
|
Client |
Use this field to select the mutual Client sharing a residence. |
|
In Collection |
Select this checkbox to indicate that the Client has not paid outstanding invoice(s) and has been placed in collection status. |
The Authorizations area of the General section contains details about the Client’s authorizations for services.

|
Field |
Description |
|---|---|
|
Hide Outdated Auths |
Select this checkbox to remove outdated authorizations from the authorizations list. |
|
Hide Voided Auths |
Select this checkbox to remove voided authorizations from the authorizations list. |
|
Service |
Displays the service code of the authorization. |
|
Ref no. |
Displays the reference number of the authorization. |
|
Begin |
Displays the beginning date of the authorization. |
|
End |
Displays the ending date of the authorization. |
|
Source |
Displays the Payer associated with the authorization. |
The Authorization window is used to add new authorizations to the Client’s admission.

The General area of the Authorization window contains details about the service that the Client is receiving authorization for.

|
Field |
Description |
|---|---|
|
Service |
Displays the code of the service being authorized. |
|
Event Code |
Displays the event code of the service being authorized. |
|
Ref. No. |
Displays the reference number of the authorization. |
|
Format |
Displays how the service is billed. |
|
Voided |
Select this checkbox to indicate the service has been voided. |
|
Maximum |
Displays the total number of hours the service can be billed for. |
|
Used |
Displays how many hours of service have been currently used. |
|
Modifier |
Displays any designated modifiers for the service. |
|
Auth Diagnosis Code |
Displays the diagnosis code of the authorization. |
The Date Range area of the Authorization window contains details about the date range over which the service is performed for the Client.

|
Field |
Description |
|---|---|
|
Begin |
Displays the date that the authorization for service began. |
|
End |
Displays the date that the authorization for service ends. |
The Authorization Comment area of the Authorization window contains any comments that have been added about the authorization.

The Limitations area of the Authorization window contains details about how many units of a service can be performed each day.

|
Field |
Description |
|---|---|
|
Limit By |
Use this dropdown to select the time range that is limited. |
|
Sat |
Displays the number of units that can be used on Saturday. |
|
Sun |
Displays the number of units that can be used on Sunday. |
|
Mon |
Displays the number of units that can be used on Monday. |
|
Tue |
Displays the number of units that can be used on Tuesday. |
|
Wed |
Displays the number of units that can be used on Wednesday. |
|
Thu |
Displays the number of units that can be used on Thursday. |
|
Fri |
Displays the number of units that can be used on Friday. |
|
Sat |
Displays between what times the visit must start on Saturday. |
|
Sun |
Displays between what times the visit must start on Sunday. |
|
Mon |
Displays between what times the visit must start on Monday. |
|
Tue |
Displays between what times the visit must start on Tuesday. |
|
Wed |
Displays between what times the visit must start on Wednesday. |
|
Thu |
Displays between what times the visit must start on Thursday. |
|
Fri |
Displays between what times the visit must start on Friday. |
The Other IDs area of the General Section contains details about other identification numbers that may be associated with the Client.

|
Field |
Description |
|---|---|
|
Entry # |
Use this field to enter the Client’s entry number. |
|
Case # |
Use this field to enter the Client’s case number. |
|
Team # |
Use this field to enter the number of the team assigned to the Client. |
|
Health Area |
Use this field to enter the health area information / number. |
The Santrax area of the General Section contains details about the Client’s associated visit verification information.

|
Field |
Description |
|---|---|
|
Enable Santrax |
Select this checkbox to indicate that Santrax has been activated for the Client. |
|
Exclude from EVV Compliance Reporting |
Select this checkbox to indicate that this Client should not be included in the EVV Compliance Report. |
|
Effective |
Use this field to select the date that Santrax was enabled for the Client. |
|
FVV Enabled |
Select this checkbox to indicate that fixed visit verification has been enabled for the Client. |
|
FVV Registration |
Click this button to open the FVV Registration Wizard. |
|
FVV registration number |
Displays the Client’s fixed visit verification number. |
|
Care Embrace Enabled |
Displays if Care Embrace is enabled for the Client. |
|
Registration Number |
Displays the Client’s registration number. |
The Schedules section contains details about visits that have been scheduled for the Client. This includes information about the assigned Staff Members, dates and times, and total hours.
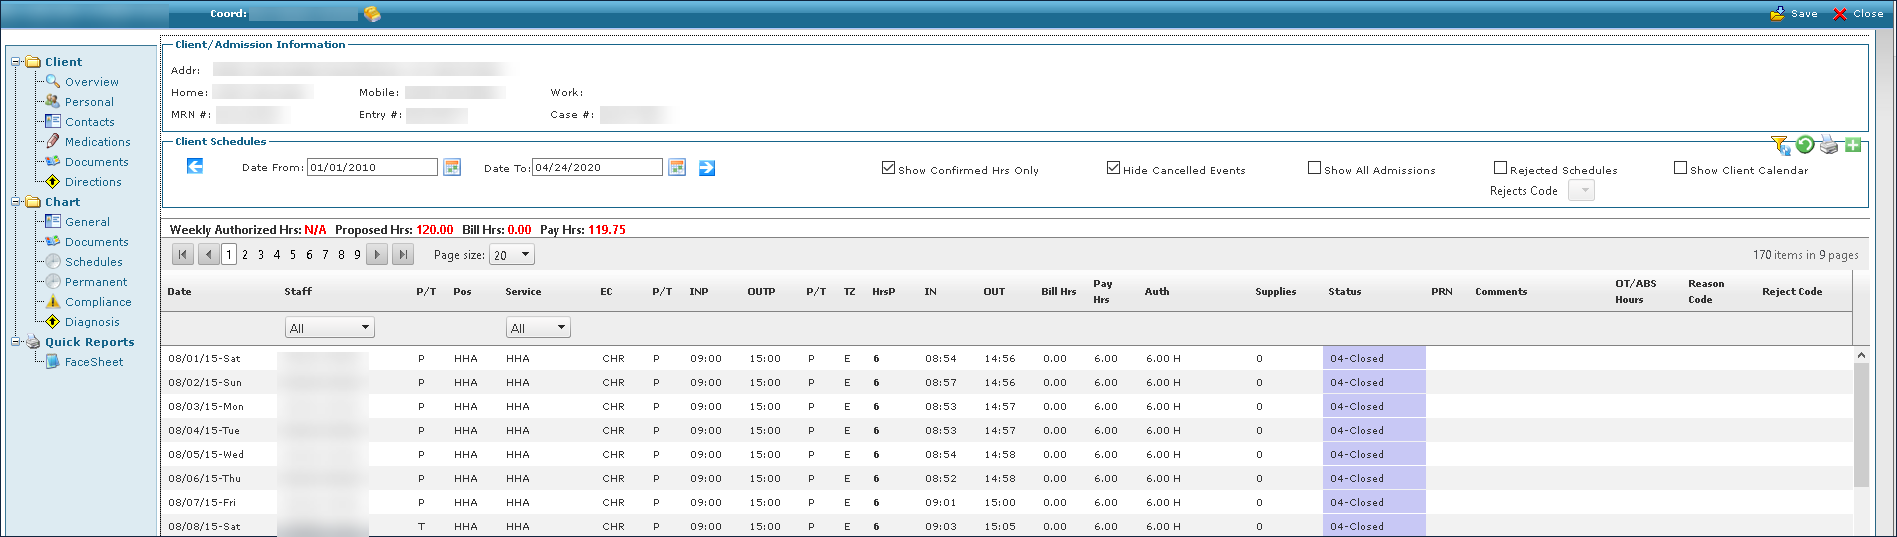
The Client / Admission Information area of the Schedules section contains details about the Client including primary address, case numbers and phone numbers.

|
Field |
Description |
|---|---|
|
Addr |
Displays the Client’s address. |
|
Home |
Displays the Client’s home phone number. |
|
MRN # |
Displays the Client’s medical record number. |
|
Mobile |
Displays the Client’s mobile phone number. |
|
Entry |
Displays the Client’s entry number. |
|
Work |
Displays the Client’s work phone number. |
|
Case |
Displays the Client’s case number. |
The Client Schedules area of the Schedules section contains the filters used to search for and locate a Client’s schedules.

|
Field |
Description |
|---|---|
|
Date From |
Use this field to select the starting date in the search range. |
|
Date To |
Use this field to select the ending date in the search range. |
|
Show Confirmed Hrs Only |
Select this checkbox to search for only confirmed hours. |
|
Hide Cancelled Events |
Select this checkbox to hide all cancelled schedules. |
|
Show All Admissions |
Select this checkbox to search all admissions. |
|
Rejected Schedules |
Select this checkbox to search for rejected schedules. |
|
Show Client Calendar |
Select this checkbox to show the client’s calendar. |
|
Rejects Code |
Use this field to search by the selected rejection code when viewing rejected schedules. |
The Search Results area of the Schedules section contains all items that match the selected filters.

|
Field |
Description |
|---|---|
|
Weekly Authorized Hrs |
Displays the Client’s weekly authorized hours. |
|
Proposed Hrs |
Displays the Client’s proposed hours. |
|
Bill Hrs |
Displays the Client’s current billable hours. |
|
Pay Hrs |
Displays the Client’s current paid hours. |
|
Date |
Displays the date of the schedule. |
|
Staff |
Displays the name of the Staff Member assigned to the schedule. |
|
P/T |
Displays a P for a Permanent schedule or T for a Temporary schedule. |
|
Pos |
Displays the position of the Staff Member. |
|
Service |
Displays the code of the service performed. |
|
EC |
Displays the event code of the service performed. |
|
P/T |
Displays a P for a Permanent schedule or T for a Temporary schedule. |
|
INP |
Displays the proposed visit call in time. |
|
OUTP |
Displays the proposed visit call out time. |
|
P/T |
Displays a P for a Permanent schedule or T for a Temporary schedule. |
|
TZ |
Displays the time zone of the visit. |
|
HrsP |
Displays the proposed length of the visit. |
|
IN |
Displays the actual visit call in time. |
|
OUT |
Displays the actual visit call out time. |
|
Bill Hrs |
Displays the billable hours for a visit. |
|
Pay Hrs |
Displays the paid hours for a visit. |
|
Auth |
Displays how many hours are authorized for the visit. |
|
Supplies |
Displays the value of any supplies used during the visit. |
|
Status |
Displays the current stats of the visit. |
|
PRN |
Displays that the schedule is PRN (as needed). |
|
Comments |
Displays any comments associated with the visit. |
|
OT / ABS Hours |
Displays any billed overtime amounts. |
|
Reason Code |
Displays the reason code. |
|
Reject Code |
Displays the rejection code. |
When viewing a Client’s schedule history there are a number of right click options that can be used to make changes, view further information or update statuses.
The Permanent section contains details about the fixed schedules that have been created for a client.

The Schedules Generated Through area of the Permanent section contains service events that are consistent across the week.

|
Field |
Description |
|---|---|
|
Generate Through |
Use this field to select the date range of schedules to be generated. |
|
Week |
Displays the week number if there are alternating or more than one schedule. |
|
Saturday |
Displays the events taking place on Saturday. |
|
Sunday |
Displays the events taking place on Sunday. |
|
Monday |
Displays the events taking place on Monday. |
|
Tuesday |
Displays the events taking place on Tuesday. |
|
Wednesday |
Displays the events taking place on Wednesday. |
|
Thursday |
Displays the events taking place on Thursday. |
|
Friday |
Displays the events taking place on Friday. |
The right click options on the Permanent section of the Client Profile can be used to simplify schedule building by managing templates, cloning and deleting weeks and making other updates as needed.

The Schedule Details area of the Permanent section contains information about events taking place on a given day.

|
Field |
Description |
|---|---|
|
Service |
Use this drop down to select the service code. |
|
Event Code |
Displays the event code. |
|
Shift Group |
Use this drop down to select the shift group. |
|
Time In |
Use this field to enter the time in for the visit. |
|
Time Out |
Use this field to enter the time out for the visit. |
|
Bill Type |
Use this drop down to select the billing type. |
|
Staff |
Use this field to select the staff member assigned to the service. |
|
Comments |
Use this field to enter any notes or comments about the visit. |
|
Miles |
Use this field to enter the travel for the visit in miles. |
|
Supplies |
Use this field to enter the dollar amount of any supplies used during the visit. |
|
Pay Type |
Use this drop down to select the pay type. |
|
TT Bill |
Use this field to enter the travel time bill amount. |
|
TT Pay |
Use this field to enter the travel time pay amount. |
|
Apply Changes |
Click this button to apply any changes to the current event. |
|
Cancel Changes |
Click this button to cancel any changes made to the event. |
|
Delete Template |
Click this button to delete the event template. |
|
Apply To All Templates |
Click this button to apply the changes to all event templates. |
|
Active |
Select this checkbox to indicate that the event is active. |
The Compliance section contains details about documents needed to maintain compliance for a client.

|
Field |
Description |
|---|---|
|
Show History |
Select this checkbox to view all compliance documents for a client. |
|
Show Non-Compliant Only |
Select this checkbox to view only non-compliant documents. |
|
Name |
Displays the name of the document. |
|
Value |
Displays if the document is completed. |
|
Effective |
Displays the date that the document was completed on. |
|
Renewal |
Displays the date that the document must be renewed by. |
|
Comment |
Displays any notes or staff members associated with the document. |
The Add Client Compliance window is used to add compliance documents to a client’s profile.

The Plan of Care section contains the client’s outlined Plan of Care, which includes all tasks that they need performed as well as the frequency of these events. While Plans of Care are usually set for a fixed period, they can be extended as required.

|
Field |
Description |
|---|---|
|
Hide Outdated |
Select this check box to hide outdated plan of cares. |
|
Service |
Displays the type of service required. |
|
Begin Date |
Displays the starting date of the plan of care. |
|
End Date |
Displays the ending date of the plan of care. |
The Plan of Care Detail window is used to add information to a client’s plan of care to ensure they are receiving the correct care and services needed.

The General section of the Plan of Care Detail window displays the basic plan of care information included the service type, the plan ID number, and the starting and ending date for the plan of care.

|
Field |
Description |
|---|---|
|
Service |
Use this drop down to select the service type. |
|
Plan ID |
Use this field to enter the Plan ID. |
|
Begin Date |
Use this field to select the Plan of Care start date. |
|
End Date |
Use this field to select the Plan of Care end date. |
The Plan Comment section of the Plan of Care Detail window displays any notes or comments associated with the client’s plan of care. These can be about the services being performed and their frequency or other notes that may be helpful in case of a substitution or change with the client.

The Plan of Care section on the Plan of Care Detail window displays the actual plan of care, including the tasks required, the frequency that they are performed, and any quick comments associated with a task.

|
Field |
Description |
|---|---|
|
Task |
Use this field to select the task to be performed. |
|
PRN |
Select this check box to indicate the task should be performed as needed. |
|
Days/Week |
Use this field to enter the number of days or weeks the task should be performed for. |
|
Sun |
Select this check box to indicate that the task should be performed on Sundays. |
|
Mon |
Select this check box to indicate that the task should be performed on Mondays. |
|
Tue |
Select this check box to indicate that the task should be performed on Tuesdays. |
|
Wed |
Select this check box to indicate that the task should be performed on Wednesdays. |
|
Thu |
Select this check box to indicate that the task should be performed on Thursdays. |
|
Fri |
Select this check box to indicate that the task should be performed on Fridays. |
|
Sat |
Select this check box to indicate that the task should be performed on Saturdays. |
|
Comment |
Use this field to enter any comments associated with the task. |
The Goals section contains details associated with the client’s objectives for recovery. This can range from immediate goals such as eating solid food again after a procedure or longer-term aspirations like walking unassisted or being able to feed oneself.

|
Field |
Description |
|---|---|
|
Description |
Displays the description of the goal. |
|
End Date |
Displays the targeted date to meet the goal by. |
The Goals window can be used to add, update, or remove a goal from a client's profile.

|
Field |
Description |
|---|---|
|
Service |
Use this dropdown to select the service type. |
|
End Date |
Use this field to select the targeted date to meet the goal by. |
|
Goal |
Use this field to enter the goal that the client is working towards. |
The Invoices section of the Invoices section contains details about any invoices associated with the client, regardless of status.

|
Field |
Description |
|---|---|
|
Date |
Displays the day that the invoice was dated. |
|
Client |
Displays the client’s name. |
|
Chart ID |
Displays the client’s chart identification number. |
|
Invoices |
Displays the invoice number. |
|
Items |
Displays the number of items on the invoice. |
|
Amount |
Displays the amount of the invoice. |
|
Balance |
Displays the current balance of the invoice. |
|
Status |
Displays the status of the invoice. |
|
Comments |
Displays any notes attached to the invoice. |
The Diagnosis section contains details about any diagnosed issues that a client may be experiencing or had in the past.

|
Field |
Description |
|---|---|
|
Rank |
Displays the code ranking of the diagnosis. |
|
Code |
Displays the code number of the diagnosis. |
|
Description |
Displays the name of the issue being diagnosed. |
|
Svr |
Displays the severity of the issue. |
|
Ex |
Displays if the diagnosed issue was exacerbated. |
|
Onset |
Displays the date the issue began occurring. |
|
Admitting Diagnosis |
Displays if the issue was the reason for admission. |
The Client Diagnosis Detail Window is used to add or edit a diagnosis on a client’s profile.

|
Field |
Description |
|---|---|
|
Code |
Use this field to enter the code of the issue. |
|
Admitting Diagnosis |
Select this checkbox to indicate that this is the reason for the client’s admission. |
|
Description |
Use this field to enter the name of the issue. |
|
Onset |
Use this field to select the date the issue began occurring. |
|
Exacerbation |
Select this checkbox to indicate if the issue was exacerbated. |
|
Rank |
Use this field to select the rank of the issue. |
|
Severity |
Use the slider to indicate the severity of the issue. |
|
Version |
Use this drop down to select the version of the ICD being referenced for diagnosis. |
The Episode section of the Client Profile screen contains information about a specific period during which a patient has been certified or authorized to receive care.

The Diagnosis area of a client episode contains information about the ailments a client was experiencing during the period.

|
Field |
Description |
|---|---|
|
Rank |
Displays the code ranking of the diagnosis. |
|
Code |
Displays the code number of the diagnosis. |
|
Description |
Displays the name of the issue being diagnosed. |
|
Svr |
Displays the severity of the issue. |
|
Ex |
Displays if the diagnosed issue was exacerbated. |
|
Onset |
Displays the date the issue began occurring. |
|
Admitting Diagnosis |
Displays if the issue was the reason for admission. |
The Client Diagnosis Detail Window is used to add or edit a diagnosis on a client’s admission.

|
Field |
Description |
|---|---|
|
Code |
Use this field to enter the code of the issue. |
|
Admitting Diagnosis |
Select this checkbox to indicate that this is the reason for the client’s admission. |
|
Description |
Use this field to enter the name of the issue. |
|
Onset |
Use this field to select the date the issue began occurring. |
|
Exacerbation |
Select this checkbox to indicate if the issue was exacerbated. |
|
Rank |
Use this field to select the rank of the issue. |
|
Severity |
Use the slider to indicate the severity of the issue. |
|
Version |
Use this drop down to select the version of the ICD being referenced for diagnosis. |
The Orders area of a client episode contains details about any adjustments that may have been made to a client’s plan of care.

|
Field |
Description |
|---|---|
|
Description |
Displays the change in the client’s care. |
|
Frequency |
Displays how often the new change needs to be performed. |
|
Effective |
Displays the date the change begins. |
|
End Date |
Displays the date that the change should be performed until. |
The Goals area of the client episode contains details about objectives the client is working towards to improve their health or recovery.

|
Field |
Description |
|---|---|
|
Description |
Displays the objective to improve recovery. |
|
End Date |
Displays the date the goal should be reached. |
The Oasis Assessment area of the client episode contains any attached OASIS assessments.

|
Field |
Description |
|---|---|
|
Name |
Displays the name of the attachment. |
|
LUPA Threshold |
Displays the Low Utilization Payment Adjustment threshold. |
|
% |
Displays the completion percentage of the OASIS. |
|
Status |
Displays the status of the attachment. |
|
Signed |
Displays if the assessment was signed electronically. |
|
Created |
Displays the date that the assessment was created. |