Sandata Agency Management 02-Client Profile Window 11-Permanent
Permanent
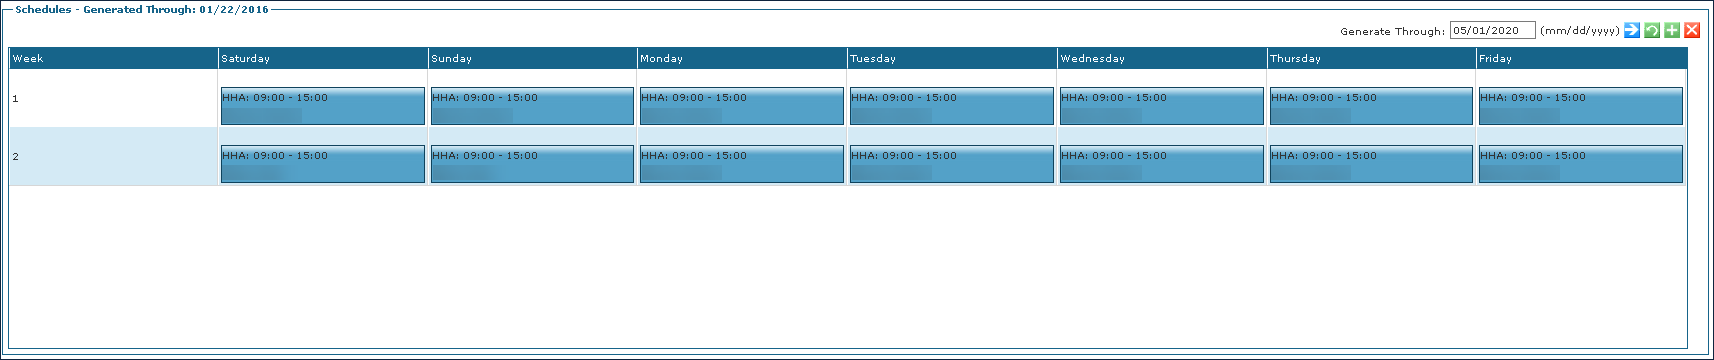
The Permanent section contains details about the fixed schedules that have been created for a Client.


The Schedules Generated Through area of the Permanent section contains service events that are consistent across the week.
|
Field |
Description |
|---|---|
|
Generate Through |
Use this field to select the date range of schedules to be generated. |
|
Week |
Displays the week number if there are alternating or more than one schedule. |
|
Saturday |
Displays the events taking place on Saturday. |
|
Sunday |
Displays the events taking place on Sunday. |
|
Monday |
Displays the events taking place on Monday. |
|
Tuesday |
Displays the events taking place on Tuesday. |
|
Wednesday |
Displays the events taking place on Wednesday. |
|
Thursday |
Displays the events taking place on Thursday. |
|
Friday |
Displays the events taking place on Friday. |
The Schedule Details area of the Permanent section contains information about events taking place on a given day.

|
Field |
Description |
|---|---|
|
Service |
Use this dropdown to select the service code. |
|
Event Code |
Displays the event code. |
|
Shift Group |
Use this dropdown to select the shift group. |
|
Time In |
Use this field to enter the time in for the visit. |
|
Time Out |
Use this field to enter the time out for the visit. |
|
Bill Type |
Use this dropdown to select the billing type. |
|
Staff |
Use this field to select the Staff Member assigned to the service. |
|
Comments |
Use this field to enter any notes or comments about the visit. |
|
Miles |
Use this field to enter the travel for the visit in miles. |
|
Supplies |
Use this field to enter the dollar amount of any supplies used during the visit. |
|
Pay Type |
Use this dropdown to select the pay type. |
|
TT Bill |
Use this field to enter the travel time bill amount. |
|
TT Pay |
Use this field to enter the travel time pay amount. |
|
Apply Changes |
Click this button to apply any changes to the current event. |
|
Cancel Changes |
Click this button to cancel any changes made to the event. |
|
Delete Template |
Click this button to delete the event template. |
|
Apply To All Templates |
Click this button to apply the changes to all event templates. |
|
Active |
Select this checkbox to indicate that the event is active. |
-
Go to the Permanent section, under Main Menu > Client > search for and open the client’s admission > Permanent, of the Client’s admission.

-
Select the Add icon to add a new week.

-
Next, right click the day being scheduled.
-
Select Add New Template.

-
Then select/enter all applicable fields: Service, Time In, Time Out, and Staff.
-
Select Apply Changes.
Repeat steps 4 and 6 to create new schedules for different days of the week.
Next, right click the schedule to copy and paste it to another day of the week if adding additional visits with same schedule details.

After all templates are created, users can right click and select Clone Week to duplicate the week’s templates and create alternating weekly schedules.
-
Select Save.
-
Select Generate Schedules for This Client.
This creates schedules through the date listed in the Generate Through field.

To view a generated schedule:
-
Go to the Client Search page under Main Menu > Client.
-
Locate and double click on the Client using the search filters.
-
Select Schedules.
-
Use the filters and checkboxes to select starting and ending dates for the schedules to be viewed.
-
Select Refresh.

When the times, event code and/or staff assigned are modified using the following steps, the permanent schedule template on the Client Profile window is updated with those changes.
If the Client, service, bill type or pay type are being changed, follow these steps and then make the change on the permanent template.
To edit a permanent schedule:
-
Use the search filters to locate the schedules being changed on the Scheduling window under Main Menu > Scheduling.
-
Select the schedules to be changed.
Multiple schedules can be selected by pressing and holding the Ctrl key and selecting the desired schedules or pressing and holding the Shift key and selecting the first and last schedule.
-
Right click on the schedules, select Mass Edit and select the schedule setting to be edited.

-
Next, enter the new changes as necessary and select Permanent (P) from the P/T dropdown menu.
-
Select the Save button.
The changes are applied to the schedules.

