Sandata Agency Management 10-System Payor Window
The System Payor window displays information, settings, and contact information for a Payer.
To access the System Payor window, select Payors under Main Menu > Billing > Payors, locate the Payer using the search filter and double click on the Payer name.


The General tab displays general information, Payor options and restrictions, billing scripts, and provider numbers.

The General section of the General tab displays basic Payer contact and billing information.

|
Field |
Description |
|---|---|
|
Name |
Use this field to enter the Payer’s name. |
|
Phone |
Use this field to enter the Payer’s phone number. |
|
Fax |
Use this field to enter the Payer’s fax number. |
|
Scheduled Week End |
Use this dropdown to select the Payer’s week ending date. When the Payer already has schedules in the system, this field is not editable. |
|
Live-In Equiv |
Use this field to set the Payer’s number of hours paid during a live-in service to limit overtime and prevent overnight pay. |
|
Reduce Hours |
Select this checkbox to enable reduced hours for a visit. |
|
Third Party ID |
Use this field to enter the ID number of the third party that the Payer uses to provide live in service. |
|
Effective |
Use this field to select the third-party service starting date. |
|
Expiration |
Use this field to select the third-party service ending date. |
|
Revenue Source |
Use this dropdown to select if the Payer is Contract or Direct. |
|
Third Party Company ID |
Use this dropdown to select the third-party company name. |
|
Dept Code |
Use this field to enter the third-party company department code. |
The Address section of the General tab displays the physical address information for the Payer.

|
Field |
Description |
|---|---|
|
Address |
Use this field to enter the Payer’s address. |
|
City |
Use this field to enter the Payer’s city. |
|
State |
Use this field to enter the Payer’s state. |
|
Zip |
Use this field to enter the Payer’s zip. |
The Script section of the General tab displays details about custom scripts that have been developed to assist with invoice and call processing.
Do not change the Billing and Event field custom scripts without contacting your implementation specialist.

|
Field |
Description |
|---|---|
|
Billing |
Use this dropdown to select a billing script to use for the Payer. |
|
Event |
Use this dropdown to select an event script to use for the Payer. |
The Billing section of the General tab displays Payer required information for billing a Client.

|
Field |
Description |
|---|---|
|
Method |
Use this dropdown to select the method of billing for the Payer. |
|
Transport |
Use this dropdown to select if the claim will be sent out as paper or electronic. |
|
Grouping |
Use this dropdown to select the Payer’s date range limitations. |
|
Billing Freq |
Use this dropdown to select the Payer’s billing frequency. |
|
Bill Code |
Use this field to enter the Payer’s bill code. |
|
Requires a Customer Number |
Select this checkbox to require a Customer Number be added for the Client. |
|
No. Mask |
Use this field to enter the character length for the Customer Number. |
|
Requires a Medicaid ID |
Select this checkbox to require a Medicaid ID number be added to the Client. |
|
Med ID Mask |
Use this field to enter the character length for the Medicaid ID number. |
|
Primary Diagnosis Required |
Select this checkbox to require a Primary Diagnosis be added for the Client. |
|
Requires Physician for Billing |
Select this checkbox to require a Physician be added to the Client. |
|
Requires Physician/NPI for Billing |
Select this checkbox to require a Physician and National Physician information number be added to the Client. |
|
Hold Split Shift Billing |
Select this checkbox to hold billing for split shift visits for the day if any of the visits are not in confirmed status. |
|
Requires Medicare Place of Service |
Select this checkbox to require a place of service be added for a Client. |
|
DOB Required |
Select this checkbox to require a date of birth be added to the Client. |
|
Ignore Weekend Split |
Select this checkbox to not split billing events on weekends. |
|
Unit Length |
Use this field to set the length of a unit for the Payer. Standard is 1 unit = 15 minutes. |
|
Unit Rounding |
Use this dropdown to round units to the nearest whole number. Example: 4.36 units rounds to 4 units. |
|
Minimum Units |
Use this field to enter the minimum number of units required to bill a Payer. |
The Options section of the General tab displays additional Payer billing and Client settings.

|
Field |
Description |
|---|---|
|
Require Auths? |
Select this checkbox to require an authorization to schedule or bill any visits and to require that any schedule duration exceeding the authorization must be confirmed by someone with billing admin permissions. |
|
Active |
Select this checkbox to indicate that the Payer is active. |
|
Enforce Signatures |
Select this checkbox to require that claims created without a signature on the 485 document can only have their invoice created by someone with the correct billing permissions. |
|
Bypass Order Validations |
Select this checkbox to allow users to save an order without a frequency and create schedules for Clients without the matching order. |
|
Assign Claim Ref to Line Items |
Select this checkbox to display the authorization reference number on the invoice. |
|
Split Invoice By Service |
Select this checkbox to confirm one invoice per service. If this checkbox is unselected, schedules for services with the same authorization number are pulled into the same invoice for the date range and billing script specified. |
|
Manager Must be R.N. |
Select this checkbox to indicate that users can only assign Managers/Coordinators to a Staff Member/Client when the manager has an assigned position that has this checkbox selected. |
|
Truncate Authorization |
Select this checkbox to only display authorization numbers before the dash on the invoice. If unselected, the full authorization is displayed. |
|
Use CMS Discharge Codes |
Selecting this checkbox to indicate that when discharging a Client, both the CMS Discharge Codes defined by Medicare and the agency defined Discharge Reason Codes are displayed. If the checkbox is unselected, only the agency defined Discharge Reason Codes display when discharging a Client. |
|
Alert on replacements over threshold |
Select this checkbox to provide an alert when a scheduled replacement is over the schedulable threshold. |
|
Is Consumer Directed |
Select this checkbox for Payors that do not create schedules prior to the visit. |
|
Allow Admit Type edit for locked clients |
Select this checkbox to allow users with the appropriate permissions to be able to edit the admission type for locked Clients. |
|
Use OMIG Reason Codes |
|
|
Concurrent Mutual Scheduling % |
Select this checkbox to choose the percentage to be billed on a mutual case where 2 schedules are at the same time with one staff member. This prevents billing the full amount for both visits since they happened together. |
|
Do NOT auto write off CARC codes 42/45 |
|
|
Auto-discharge clients w/o active auths |
Select this checkbox to automatically discharge Clients whose authorizations have ended or expired. |
|
Auto-discharge Reason |
Use this dropdown to select the reason code to be used when Clients are automatically discharged for an expired or ended authorization. |
|
Show Wkly Auths w Daily Limits |
Select this checkbox to show daily allocations for authorizations with limitation by week. |
|
Allow Exporting |
Select this checkbox to allow electronic billing to be exported to the Payer. |
|
Require Service Description |
|
|
TN Consumer Directed |
|
|
Use Proposed Times for Actual |
Select this checkbox for Payers not using Electronic Visit Verification to have the proposed schedule times counted as the actual schedule times and have the visits confirmed after the schedule time has passed. |
|
Bypass NPI Validations for Export? |
Select this checkbox to prevent National Provider Identifier (NPI) validation during the export. |
|
Use Staff NPI |
Select this checkbox to automatically include a staff member’s NPI number in electronic invoices. To enable this, the Payor Format must include a NPI number and the This payor required Rendering Provider in the 2420A-Loop checkbox must be selected on the EDI Settings tab. |
|
Trim Invoice Bill Dates |
Select this checkbox to display the first and last dates of service on the invoice. If the checkbox is not selected, the date range on the Billing Review window under Main Menu > Billing during invoice creation is displayed. |
|
Allow Mass Edit of Clients |
Select this checkbox to allow users with the correct permissions to mass edit a Client assigned to multiple schedules from the Schedule Overview window under Main Menu > Scheduling. |
|
Use Taxonomy Code |
Select this checkbox to include the taxonomy code from the Provider tab on electronic invoices for this Payer. |
|
Allow Manual Sched Gen |
Select this checkbox to allow users with the correct security permissions to generate schedules from the permanent template on a Locked Client. |
|
POC Acknowledgement |
|
|
Allow Submission of Zero Balance Invoices |
|
|
Mobile App Enabled must use mobile device |
|
|
Allow Schedule Split Functionality |
Select this checkbox to allow the splitting schedules at midnight. |
|
Access Invoice from Schedule |
Select this checkbox to enable a link to the invoice a schedule is attached to from the Schedule details window. |
|
Warn if scheduled for more than 24 hours for a day |
Select this checkbox to display a warning when a schedule is added or edited, if scheduled for more than 24 hours for the same service on the same date. |
|
Require schedules to split at midnight |
Select this checkbox to prevent billing for any split shift that is missing proposed times. |
When entered by the agency, the Provider Numbers section of the General tab displays the Payer’s provider numbers including Tax ID, API, NPI and others.

|
Field |
Staff |
|---|---|
|
Location |
Displays the location of each Provider number row. |
|
Number |
Displays the Provider number. |
|
API |
Displays the Application Programming Interface (API) number. |
|
NPI |
Displays the National Provider Identifier (NPI) number |
|
Locator |
Displays the Provider locator number. |
|
Taxonomy |
Displays the Provider taxonomy number. |
|
TaxID |
Displays the Provider tax identification number. |
The Comments section of the General tab displays any additional notes or information to be included about the Payer.

The Plan tab displays the rate lines associated with a Payer, and their paper invoice setup. The Plan tab includes different rate line tabs such as Billing Rates and Payroll Rates.

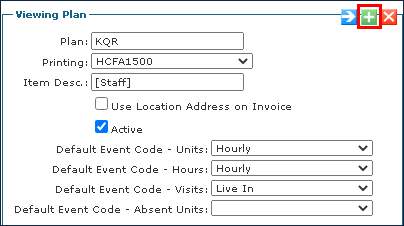
The Viewing Plan section of the Plan tab displays information about the currently viewed Payer plan and its associated settings.

|
Field |
Description |
|---|---|
|
Plan |
Use this field to enter the name of the plan. |
|
Printing |
Use this dropdown to select the claim format for output. |
|
Item Desc |
Use this field to enter the line item description when invoicing. |
|
Use Location Address on Invoice |
Select this checkbox to use the location address when invoicing. |
|
Active |
Select this checkbox to indicate that the plan is active. |
|
Default Event Code – Units |
Use this dropdown to select the default event code for the Units. |
|
Default Event Code – Hours |
Use this dropdown to select the default event code for Hours. |
|
Default Event Code - Visits |
Use this dropdown to select the default event code for Visits. |
|
Default Event Code - Absent Units |
Use this dropdown to select the default event code for Absent Units. |
The Copay section of the Plan tab displays copay settings for the Payer plan.

|
Field |
Description |
|---|---|
|
Copay Plan |
Select this checkbox to indicate that this plan is a copay plan. |
|
Has Copay |
Select this checkbox to indicate that this plan has a copay. |
The Options section of the Plan tab displays additional invoicing options associated with the plan.

|
Field |
Description |
|---|---|
|
Show Balances |
Select this checkbox to display account balances on invoices. |
|
Under 21 Special Handling |
|
|
Frequency |
Use this dropdown to choose the length of the plan. |
|
Term Offset |
Use this field to choose the offset date amount for the plan. |
|
Footer Text |
Use this field to enter the text to be displayed on the bottom of the invoice. |
|
Display confined text Locator 26 of 485 |
Select this checkbox to populate the Medicare confined test in locator 26 of the CMS 485. |
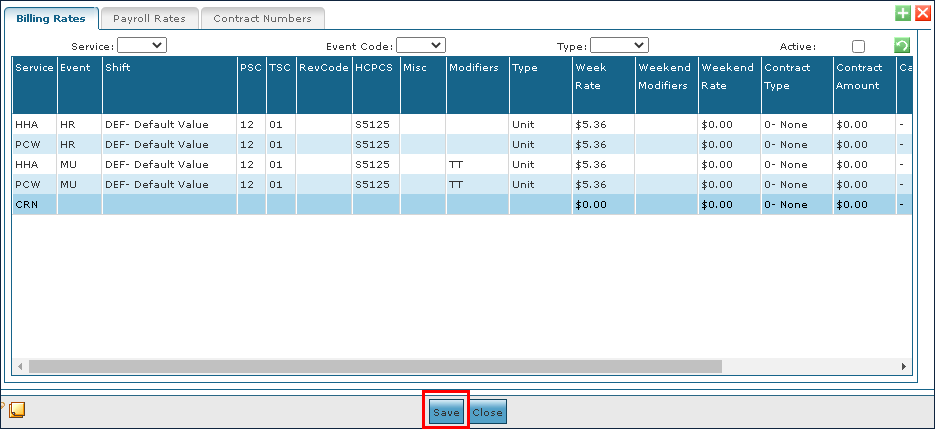
The Billing Rates tab on the Plan tab displays the rates being billed to Clients or their insurer.

|
Field |
Description |
|---|---|
|
Service |
Displays the service associated with the rate. |
|
Event |
Displays the event code associated with the rate. |
|
Shift |
Displays the shift code for the service associated with the rate. |
|
PSC |
Displays the place of service code associated with the rate. |
|
TSC |
Displays the time of service code associated with the rate. |
|
RevCode |
Displays the revenue code associated with the rate. |
|
HCPCS |
Displays the Healthcare Common Procedure Coding System code associated with the rate. |
|
Misc |
Displays any miscellaneous information about the rate. |
|
Modifiers |
Displays any modifiers associated with the rate. |
|
Type |
Displays how the service is calculated and billed. |
|
Week Rate |
Displays the rate if charged on a weekday. |
|
Weekend Modifiers |
Displays any weekend modifiers associated with the rate. |
|
Weekend Rate |
Displays the rate if charged on a weekend day. |
|
Contract Type |
Displays the contract type associated with the rate. |
|
Contract Amount |
Displays the contract amount associated with the rate. |
|
Cap |
Displays the cap amount associated with the rate. |
|
Rank |
Displays the rank of the rate. |
|
Effective Date |
Displays the date the rate began. |
|
Alt Service Code |
Displays the alternate service code associated with the rate. |
The Payroll Rates tab on the Plan tab displays the rates being paid to Field Staff for services.

|
Field |
Description |
|---|---|
|
Service |
Displays the name of the service. |
|
Event |
Displays the event code associated with the service. |
|
Shift |
Displays the shift that the service occurs during. |
|
Type |
Displays how the service is calculated and paid. |
|
Week Rate |
Displays the weekday rate amount. |
|
Weekend Rate |
Displays the weekend rate amount. |
|
Cap |
Displays the cap amount associated with the rate. |
|
Rank |
Displays the rank of the rate. |
|
Effective Date |
Displays the alternate service code associated with the rate. |
Payers can have a variety of different rate plans. For example, if providing billable services for Blue Cross/Blue Shield and it has multiple rate plans, billing rates can be set up for each plan separately and name them accordingly.
When adding a new Payor by default the name of the Plan will be Default, the invoice Printing type is Client Invoice.rpt and the Item Desc. Will be [Staff].
-
Go to the System Payor window under Main Menu > Billing > Payors.
-
Double click on the desired payer.

-
Select the associated Rate Plan tab.
-
Then, select the Add icon.
-
Select the appropriate settings and add the necessary rate information.
-
Select the Save button.

Once a rate plan has been created, it can be edited any time.
-
Go to the System Payor window under Main Menu > Billing > Payors.
-
Double click on the desired Payer.

-
Select the associated Rate Plan tab.
-
Select the appropriate corrections or changes to the rates and settings.
-
Select the Save button.

Existing rate plans can be copied to the current or a different payer. To clone a rate plan:
-
Go to the System Payor window under Main Menu > Billing > Payors.
-
Double click the selected Payer.

-
Select the associated Rate Plan tab.
-
Select the Copy This Rate Plan button.

-
Select the Payer to copy the rate plan to.
-
Select the Save button.

-
Enter the new plan name.
-
Select the Ok button.

If a rate plan is no longer in use but must be saved for whatever reason, it can become inactive rather than being deleted. To deactivate an existing rate plan:
-
Go to the System Payor window under Main Menu > Billing > Payors.
-
Double click the selected Payer.

-
Deselect the Active checkbox.
-
Select the Save button.

A rate plan can be removed or deleted if it is not in use on any Client admission. To remove an out of date or incorrect rate plan:
-
Go to the System Payor window under Main Menu > Billing > Payors.
-
Double click the selected Payer.

-
Select the Delete this Rate Plan button.

-
Select the Yes button.

Users can search for rate line(s) by using the Service, Event Code, Type or Active filters. A current rate line becomes Inactive when a new rate line is created with the same Service/Event/Shift/Type/Rank combination and more recent effective date.
To filter the results, select the filters as desired and then select the refresh icon (![]() ).
).

Once a rate plan has been created, it is ready to have new rates added.
-
Go to the System Payor window under Main Menu > Billing > Payors.
-
Double click the selected Payer.

-
Select the associated Rate Plan tab.
-
Select the tab of the rate to be added.

-
Select the Add icon.

-
Choose the service associated with the rate.
-
Enter the rate information.

-
Select the Save button.

Once the rate has been added to an existing plan, it can be edited at any time.
-
Go to the System Payor window under Main Menu > Billing > Payors.
-
Double click the selected Payer.

-
Select the associated rate plan tab.
-
Select the tab of the rate to be edited.

-
Edit the rate information.

-
Select the Save button.
Once a rate has been created and updated, it can be cloned without having to re-add the rate information.
-
Go to the System Payor window Main Menu > Billing > Payors.
-
Double click the selected Payer.

-
Select the associated rate plan tab.
-
Select the tab of the rate to be cloned.

-
Right click the rate to be cloned and select the Clone button.

-
Select the effective date of the cloned rate.
-
Select Submit.
The cloned rate is displayed at the bottom of the rate list.

Existing rates that are no longer active, invalid, or expired can be deleted from the Payer plan.
- Go to the System Payor window Main Menu > Billing > Payors.
-
Double click the selected Payer.

-
Select the associated rate plan tab.
-
Select the tab of the rate to be deleted.

-
Select the rate to be deleted.
-
Select the Delete icon.

-
Select the Yes button.
The selected rate is deleted.

The Contacts tab displays the names, phone numbers, and addresses associated with a Payer.

|
Field |
Description |
|---|---|
|
Column one |
Displays the type of contact. |
|
Name |
Displays the name of the contact. |
|
Work Phone |
Displays the work phone number of the contact. |
To add a new contact to a Payer:
- Go to the System Payor window Main Menu > Billing > Payors.
-
Double click the selected Payer.

-
Select the Contacts tab.
-
Select the Add icon.

-
Enter the contact’s information.
-
Select the Save button.

Once a contact has been added to a payer, it can be edited any time.
- Go to the System Payor window Main Menu > Billing > Payors.
-
Double click the selected Payer.

-
Select the Contacts tab.
-
Double click on the contact to be edited.

-
Edit the contact’s information as needed.
-
Select the Save button.

Contacts who have left the company or changed roles can be removed from a Payer at any time. To delete a contact:
-
Go to the System Payor window under Main Menu > Billing > Payors.
-
Double click the desired Payer.

-
Select the Contacts tab.
-
Double click the contact to be edited.

-
Select Delete.

-
Select the Yes button.

The Electronic Data Interchange (EDI) Settings tab controls how the electronic billing for the Payer is formatted, configured, and sent.
When setting up a Payer that accepts electronic billing, the EDI Settings tab must be correctly configured to ensure billing exports to the Payer are in the proper format.
Changes to the EDI Settings can interfere with the acceptance of electronic claims. Be sure to work with an Implementation Specialist to properly set up and configure the EDI settings for the Payers. If there are additional issues, please reach out to Customer Care.

The File Format and Options section of the EDI Settings tab displays the electronic format and output settings associated with the Payer.

|
Field |
Description |
|---|---|
|
Format |
Use this dropdown to select the claims format for the Payer. |
|
Eligibility |
This dropdown is used by Implementation to determine various eligibilities. |
|
File Mask |
Use this field to determine the layout of the claim file. |
|
Max Claims |
Use this field to set the number of claims that can be exported at once. |
|
Max Lines |
Use this field to set the number of lines than be exported per submitted claim at once. |
|
Export No |
Use this field to set the reference number for the claim submission. |
The Electronic Codes section of the EDI Settings tab displays the electronic code options for configuring exports and claim files.

|
Field |
Description |
|---|---|
|
EC ID |
Use this field to select the type of Payer being billed. |
|
EC Number |
Use this field to enter the number of the Payer who is paying the claim. |
|
Carrier Code |
Use this field to enter the Payer’s carrier code. |
|
Filing Ind |
Use this field to enter the Payer’s filing indicator code. |
|
Sender ID |
Use this field to enter the sender identification code. |
|
Sender No |
Use this field to enter the sender identification number. |
|
Receiver ID |
Use this field to enter the receiver identification number. |
|
Receiver No |
Use this field to identify who receives the claim for processing. |
|
Max Delay |
This dropdown is used by Implementation to set the max delay number. |
|
Default Code |
This dropdown is used by Implementation to set the default code. |
The Misc. Options area of the EDI Settings tab is used to configure a variety of options related to processing electronic claims.

|
Field |
Description |
|---|---|
|
GL Account No |
Use this field to enter the agency’s general ledger number. |
|
This Payer Uses a Supplemental File for 835 Pend/Deny Reporting |
Select this checkbox if the payer uses a supplemental file to report Pending and Denied statuses on the claims. |
|
Include Rendering Staff Name/NPI in 2420A Loop |
Select this checkbox if the Payer requires the claim to include the rendering staff's name and NPI in the 2420A loop on the export file. |
|
Include REF D9 line in EDI export. |
Select this checkbox if the Payer requires that the REF D9 line be included in the export file. |
|
Include Service Facility Address |
Select this checkbox if the Payer requires that the service facility address be included in the export file. |
|
Use Authorization Provider. |
Select this checkbox to use the Authorization Provider. |
|
Disable Export |
Select this checkbox to disable the billing export for this Payer. When checked, the system does not create an export file for invoices attached to this payer. |
|
Use 5010 when sending 270 files. |
Select this checkbox if the Payer request that you send 270 files on the 5010 format. This enables the "270 Batch Eligible" field. |
|
Remittance Format |
Use this dropdown menu to choose the Payer's remittance format, 5010 or 4010. |
|
Custom ID |
Use this field to enter the custom identification number set by the agency. |
|
Include Remit Address |
Select this checkbox to include the Remit Address on the export file. |
|
Use Carrier Codes |
Select this checkbox to use carrier codes. |
|
Include Ordering Physician in the 2420E Loop. |
Select this checkbox if the payer requires the Order Physician information in the 2420E Loop on the export file. |
|
Include Rendering Physician in the 2420A Loop. |
Select this checkbox if the payer requires the Rending Physician in the 2420A Loop on the export file. |
|
Report Supervising Staff Name and NPI |
Select this checkbox if the Payer requires the Supervising Staff's name and NPI on the export file. |
|
Include Contract Info in the 2310B Loop. |
Select this checkbox if the Payer requires the contract info in the 2310B loop on the export file. |
|
Include Contract Info in the 2310B Loop |
Select this checkbox if the Payer requires the contract info in the 2310B loop on the export file. |
|
Include G2 segment for 2310B Loop |
Select this checkbox if the Payer requires the G2 segment on the 2310B loop on the export file. |
|
Hold Visit Verification with no Address Type |
Select this checkbox if you need the system to not auto-confirm visits for this Payer when there is no address type set on the client's profile. |
|
Hold Visit Verification with no Zip Code |
Select this checkbox if you need the system to not auto-confirm visits for this Payer when there is no Zip code set on the Client's profile. |
|
Hold Visit Verification with no Service |
Select this checkbox if you need the system to not auto-confirm visits for this Payer when there is no service verification on the visit. |
|
Hold Visit Verification with no Customer Number |
Select this checkbox if you need the system to not auto-confirm visits for this Payer when there is no customer number set on the Client's profile. |
The File Transfer Settings area on the EDI Settings tab displays the connection information used to export claims.

|
Field |
Description |
|---|---|
|
Send To FTP Server When Generating File. |
Select this checkbox to upload completed export files to the designated FTP server. |
|
Secured FTP |
Select this checkbox to add the information for the secured FTP server. |
|
Server |
Use this field to enter the IP address of the FTP server. |
|
Port |
Use this field to enter the port address of the FTP server. |
|
Directory |
Use this field to enter the default director to upload the exported claims to on the FTP server. |
|
Login |
Use this field to enter the login name for the FTP server. |
|
Password |
Use this field to enter the password for the FTP server. |
The Santrax Settings tab controls how data is transferred between Sandata Electronic Visit Verification (EVV) and Sandata Agency Management.
Changes to the Santrax Settings tab can interfere with the transfer of data from Sandata Agency Maintenance to Sandata EVV. Be sure to work with Sandata Customer Support to properly set up and configure the Santrax Settings for your Payor.

The Santrax Options area of the Santrax Settings tab displays options for configuring a payer’s EVV settings.

|
Field |
Description |
|---|---|
|
Enable Santrax for Clients With This Payor |
Select this checkbox to enable EVV for the Payer. |
|
Santrax Account Number |
Use this field to select the Payer’s Santrax Account Number. This field defaults to the Primary Santrax Account Number that was set by the Implementation Specialist. If the agency is set up for multiple Santrax Accounts, select the account number that is linked to this Payer. |
|
Client Identifier |
Use this dropdown to select the field that is used as the Client identifier for the Payer. |
|
Contract Identifier |
Use this dropdown to select the field that is used as the contract identifier for the Payer. |
|
Payor Name |
Use this field to specify the contract code if the contract identifier set to other.
|
|
A/R Identifier |
|
The Confirmation and Hold Settings area on the Santrax Options tab contain options to limit the automatic confirmation of visits when calls are received, based on the number of required tasks completed and call duration.

|
Field |
Description |
|---|---|
|
Task required for confirmation |
Select this checkbox to require tasks prior to changing a schedule's status to Confirmed. |
|
Minimum number of tasks required |
Select this checkbox and indicate the number of tasks required to change a schedule’s status to Confirmed. |
|
Critical task required for confirmation |
Select this checkbox to require Critical tasks prior to changing a schedule’s status to Confirmed. |
|
Minimum number of critical tasks required |
Select this checkbox and indicate the number of critical tasks required to change a schedule’s status to Confirmed. |
|
Hold if Missing Task Reading |
Select this checkbox to require a task reading to be entered prior to changing a schedule's status to Confirmed. |
|
Include task in 3rd party export |
|
|
Allowed Rounded Duration Differential |
Use this field to specify at the Payor level how many minutes outside of the Proposed total hours a rounded Santrax hours value can confirm a visit, by setting the Allowed Rounding Duration Differential. If the visits actual rounded hours are outside the differential, the visit is marked as on hold. The default for this field is zero minutes. |
|
Allowed Call Time Differential |
Use this field to specify how many minutes outside of the proposed schedule the actual Santrax start time can be set to automatically Confirm the visit. If a visit call time is outside of the differential, the visit will be marked as on hold, and have the exception Call Time Outside Payor Tolerance. The default value for this field is 120 minutes. |
|
Minutes from |
Use this dropdown to set the threshold tolerance level. |
|
Include Health Risk info in 3rd party Missed Visits export |
|
|
Exclude schedules / visits with no auth from export files |
|
The Tasks Mapping area of the Santrax Settings tab displays the exportable values of various tasks.

|
Field |
Description |
|---|---|
|
Task ID |
Displays the task identification code. |
|
Export Value |
Use this field to enter the exportable value of the designated task identification code. |
The Telephony Exceptions area of the Santrax Settings tab displays the selected telephony exceptions that are enabled for use with Electronic Visit Verification (EVV).

|
Field |
Description |
|---|---|
|
Exception name |
Displays the exception name. |
|
Checked |
Select this checkbox to enable the exception. |
|
Exception code |
Use this field to enter the exception code. |
|
Send to AGG |
Select this checkbox to export the flagged exception to Aggregator. |
The Program Codes area of the Santrax Settings tab displays the program codes associated with the established services.

|
Field |
Description |
|---|---|
|
Service |
Displays the name of the service. |
|
Program |
Use this field to enter the program code for the associated service. |
To add a new program code on the Santrax Settings tab:
-
Go to the System Payor window under Main Menu > Billing > Payor.
-
Double click the desired Payer.

-
Select the Santrax Settings tab.

-
Select the Add icon.
-
Use this fields to enter the service and program code.

-
Select the Save button.

To delete a program code from the Santrax Settings tab:
-
Go to the System Payor window under Main Menu > Billing > Payor.
-
Double click the desired Payer.

-
Select the Santrax Settings tab.

-
Select the program code to be deleted.
-
Select the Delete icon.

The Providers tab displays the provider numbers associated with the Payer.

|
Field |
Description |
|---|---|
|
Number |
Use this field to enter the provider number associated with the Payer. |
|
API |
Use this field to enter the API number associated with the Payer. |
|
NPI |
Use this field to enter the NPI number associated with the Payer. |
|
Locator |
Use this field to enter the locator number associated with the Payer. |
|
Taxonomy |
Use this field to enter the taxonomy number associated with the Payer. |
|
TaxID |
Use this field to enter the tax identification number associated with the Payer. |
To add a new provider:
-
Go to the System Payor window under Main Menu > Billing > Payor.
-
Select the desired Payer.

-
Select the Providers tab.

-
Select the Add icon.
-
Enter the Provider numbers in the associated fields.
-
Select the Save button.

To remove an existing provider:
-
Go to the System Payor window under Main Menu > Billing > Payor.
-
Select the desired Payer.

-
Select the Providers tab.

-
Then select the Provider to be removed.
-
Next, select the Delete icon.

-
Then select the Yes button.
-
The selected provider is removed from the Payer.

The Staff Exclusions tab displays the list of all Field Staff marked for exclusion from employment associated with the Payer.

|
Field |
Description |
|---|---|
|
Staff Name |
Displays the name of the excluded Staff Member. |
|
Agency ID |
Displays the agency identification number of the excluded Staff Member. |
|
Exclusion Type |
Displays the exclusion type of the excluded Staff Member. |
|
Reason for Exclusion |
Display’s the reason for excluding the Staff Member. |
|
Start Date |
Displays the beginning date of the exclusion. |
|
End Date |
Displays the ending date of the exclusion. |
To add a new staff exclusion:
-
Go to the System Payor window under Main Menu > Billing > Payors.
-
Double click the desired Payer.

-
Then select the Staff Exclusions tab.
-
Select the Add icon.

-
Use the filters to locate the Staff Member and enter the exclusion reason information.
-
Select the Save button.

To remove an existing staff exclusion:
-
Go to the System Payor window under Main Menu > Billing > Payors.
-
Double click on the desired Payer.

-
Select the Staff Exclusions tab.
-
Double click on the staff exclusion to be removed.

-
Select the Delete icon.

-
Then select the Ok button.

The Compliance Settings tab displays the list of selected compliance items associated with the Payer.

The Available Compliance Items area of the Compliance Settings tab displays the list of compliance items that can be assigned to the Payer.

|
Field |
Description |
|---|---|
|
Name |
Use this field to select the compliance item to be added to the Payer’s compliance settings. |
The Selected Compliance Items area of the Compliance Settings tab displays the list of compliance items that has been assigned to the Payer.

|
Field |
Description |
|---|---|
|
Name |
Displays the name of the selected compliance item. |
|
Description |
Displays the description of the compliance item. |
|
Result |
Select this checkbox to require the result of the compliance item. |
|
Cmp Date |
Select this checkbox to require the completion date of the compliance item. |
|
Exp Date |
Select this checkbox to require the expiration date of the compliance item. |
To add a new compliance item to a Payer:
-
Go to the System Payor window under Main Menu > Billing > Payors.
-
Double click the desired Payer.

-
Select the Compliance Settings tab.

-
Then select the compliance item to be added.
More than one item can be selected by pressing Ctrl and selecting the additional items.
-
Select the arrow head button to add a compliance item.
-
Enter the compliance item information in the fields.
-
Then select the Save button.

To remove a compliance item:
-
Go to the System Payor window under Main Menu > Billing > Payors.
-
Double click the desired Payer.

-
Select the Compliance Settings tab.

-
Select the compliance item to be removed.
More than one item can be selected by pressing Ctrl and selecting the additional items.
-
Select the arrow head button to remove a compliance item.
-
Then select the Save button.
