Sandata Agency Management 08-Manual Remittance
The Manual Remittance feature is used to record an individual payment, batch payments, and take backs. Batch payments are used when entering payments for remittances that contain multiple payments and/or multiple checks from one or more payers. Take backs can also be entered for invoices that have already been paid.
An invoice cannot be voided from the Manual Remittance window. For more information, please see, Void an Invoice.


Use these fields to identify all manually posted payments or take backs.
Users with appropriate security permissions can populate the Bank ID dropdown using the Bank section of the Value Items window's Billing folder. Users can then select a Payer and all invoices for the Payer display for manual posting.

|
Field |
Description |
|---|---|
|
Batch Number: |
Displays the system-assigned ID number for the transaction(s).This number populates once the Create Batch button is selected. |
|
Apply As: |
Use this dropdown to choose the format in which the transaction(s) are received (cash, adjustment, account cash, etc.). |
|
Batch Total: |
Use this field to enter the total dollar amount of transaction(s). Note: Adjustments/take backs may be negative amounts. |
|
Batch Date: |
Use this field to select the date the transaction(s) are applied. Note: Can be past, present, or future date. |
|
Bank ID: |
Use this dropdown to select the name of the financial institution receiving payments. |
|
Batch Type: |
Use this dropdown to select the type of transaction(s) being entered. For example, Check, Denial, Electronic Transfer, etc. |
|
Batch Balance: |
Displays the dollar amount of funds available for application to invoices. |
|
Checks: |
Leave this field blank. If checks have already been posted, they can be selected for reference. |
|
Create Batch |
Select this button to make the funds entered in this section available for use. |
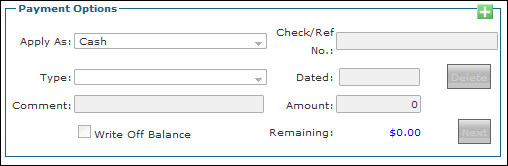
These fields are used to enter the payer remittance total amount type, the Check/Reference number, and the date of the paper remittance.
|
Field |
Description |
|---|---|
|
Apply As: |
Use this dropdown to select the format in which the transaction(s) are received (for example, cash, adjustment, account cash, etc.). Automatically populates when the Create Batch button is selected. |
|
Check/Ref No.: |
Displays the number of the check or other reference number assigned to the payment. |
|
Type: |
Use this field to select the type of transaction (Check, Denial, Adjustment, etc.). Note: Options are conditional depending on the selection made in the Apply As: field. |
|
Dated: |
Displays the date assigned to the check or payment in the Check/Ref No.: field. |
|
Comment: |
Use this field to enter any applicable comments in this free-text field. |
|
Amount: |
Displays the amount of the check or payment. |
|
Write Off Balance |
Check this box to write off the remaining balance after posting a payment. When using this functionality, it is best practice to post payments to individual invoice line items. |
|
Remaining: |
Displays the remaining funds available for application to invoices. The amount will reduce as each payment is posted. |
|
Delete |
Select this button to delete the current payment and refresh all fields. |
|
Next |
Select this button when ready to enter another check, takeback, or adjustment. It can only be used after the total amount for the previous check is posted. |
Use these fields to locate the desired invoice(s)/line item(s) the payment or take back is being applied to.

|
Field |
Description |
|---|---|
|
Payor: |
Use this dropdown to limit the invoices displayed to the selected Payer. This field must be selected to display invoices in the Active Records section. |
|
Location: |
Use this dropdown to limit the invoices display to a specific location. |
|
Invoice: |
Use this field to search for an invoice using the invoice number. |
|
Client |
Use this dropdown to filter the invoices by client. |
|
Include Paid |
Select this checkbox to display paid invoices in addition to open invoices. This will be enabled as the default when the Batch Type is Takeback. |
|
Invoice Date Range From:/To: |
Use this field to search for invoices by their invoice date within a user-defined date range. |
|
Service Date Range From:/To: |
Use this field to search for invoices by their service date within a user-defined date range. |
This section is a listing of available invoices that meet the search criteria entered in the Invoice Filters and Date Range sections. This is also where payments are individually applied to the invoice using the Post, Write Off, and Action columns.
The active records are listed by Client and invoice number. The invoice's total Billed amount and Client's remaining balance are listed. Selecting the plus sign to the left of the invoice lists the individual visits/services included in the invoice.
For security reasons, using the call Client function logs the user out of the application.
This section is a listing of the payments applied that are posted during the current session/batch.

|
Field |
Description |
|---|---|
|
Client |
Displays the Client’s name |
|
Invoice |
Displays the invoice number |
|
Date |
Displays the date the invoice was created |
|
Billed |
Displays the amount billed on the invoice/line item |
|
Balance |
Displays the amount owed on the invoice/line item |
|
Post |
Displays the amount being paid for this invoice/line item |
|
Adjustment |
Displays the amount of the adjustment being made for this invoice |
|
Type |
Displays the type of adjustment being made. This must be selected if an adjustment amount is entered. |
|
Status |
Displays the status of the invoice/line item |
|
Clear Queue |
This button clears all entries displayed in the Current Queue. |
|
Action |
These buttons execute different actions for the invoice. |
To post payments:
-
Go to the Manual Remittance window under Main Menu > Billing > Manual Remittance.
-
Fill in/select the fields in the Batch Options section.
-
A. Make sure selections in the Apply As and Batch Type fields reflect the type of transactions being entered.
-
Please note, the Batch Number, Batch Balance, and Checks filters do not need to be selected, they auto populate.
-
When posting a batch payment, the Batch Total must reflect the correct sum of all the payments being applied.
-
-
Select Create Batch.

-
Fill in/select the filters in the Payment Options section.
-
When posting batch payments, each check included in the batch is individually entered in this section.
-
Several fields in the Payment Options section also auto populate based on the Batch Options filters selected.
-
The total of all payments in the batch must match the amount in the Batch Total in the Batch Options section. The amount in Payment Options can be all or part of the batch total, when entering multiple checks.

-
-
Fill in the fields in the Invoice Filters, Invoice Date Range or Service Date Range sections to search for the invoice(s)/line item(s) the payment is being applied to.
-
Payoris a required field.
-
When applying a batch payment, the entire amount of the selected Payer’s remittance total amount must be applied before moving on to another Payer.

-
-
Distribute the payment as necessary using the Active Records section.
Post payments until the balance in the Remaining field in the Payment Options section is zero.
The Batch Balance (Batch Options section) and Remaining (Payment Options section) fields decrease as each payment is posted.
The buttons in the Action column can be used to view, clear, or apply payments to the invoice/item:
-
I (Invoice Details): Clicking this button opens the invoice.
-
P (Pay off Balance): Clicking this button applies a payment’s full balance amount.
-
W (Write Off balance): Clicking this button writes off any remaining balance for an invoice/line item.
-
D (Denied): Clicking this button applies a zero a dollar amount for an invoice/line item.
-
X (Clear Current Row): Clicking this button clears payments entered for an invoice/line item.

-
-
Select the Next button in the Payment Options section to apply each subsequent check, if posting a batch payment.
-
Repeat steps as needed until the batch balance is zero, if posting a batch payment.
Select Save to pause the posting session and return to it later. A user's saved session must be completed or discarded before beginning another session.

-
Select Post Now to complete your manual remittance session.
-
The batch cannot be posted until the batch balance is zero.
-
Once committed, no further payment edits can be made.
-
When prompted, print, and/or save a copy of the Manual Remittance Queue report for future reference.

-
The Manual Remittance feature accommodates adjustments to invoices. There can be numerous reasons to adjust an invoice (for example: credits, rate adjustments; write offs, denials, take backs, etc.). In manual remittance, adjustments are entered using the Adjustment field. Adjustments can be made in combination with payments or by themselves.
To enter an adjustment, perform the same actions as in the Posting Payments/Batches section with the following exceptions:
Under Active Records:
-
Enter the amount of the adjustment in the Adjustment field.
-
Select the adjustment type from the Type field after entering the amount.
A type must be selected to successfully enter an adjustment.
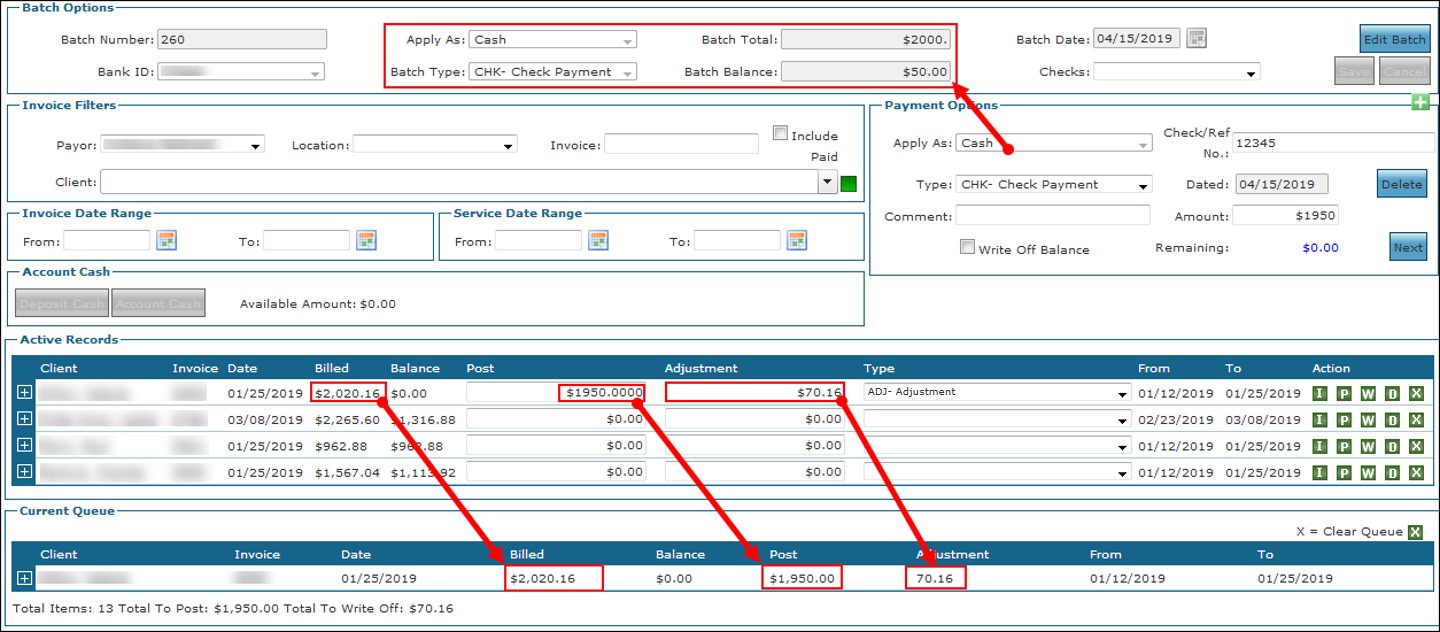
In this example, the user received a check for $1950 to pay off an invoice of $2020.16. Because the contractual payment is only $1950, an adjustment is entered so the invoice is paid in full. The user enters the payment of $1950 in the Post column. The balance changes to $70.16. The user then enters this amount in the Adjustment field and selects the type. The adjustment is applied, and the invoice balance becomes $0. Both the payment and adjustment display in the Current Queue.
Adjustments are entered as payments using manual remittance. Negative adjustments are entered as take backs.
Refunds to the Payer are called takebacks. For example, when a revised invoice is submitted, and the previous invoice must be reimbursed.
The process for posting takebacks is the same as posting regular payments except that when entering amounts in the Post column, negative amounts are entered.
Perform the same actions as in the Posting Payments/Batches section with the following exceptions:
-
Under Batch Options, create a new batch with a negative total.
-
Batch Total: This negative value is the total amount of all the takebacks to be posted.
-
Apply As: Cash
-
Batch Type: TB- Take Back
-
The total of all payments in the batch must match the amount in the Batch Total in the Batch Options section. The Amount in Payment Options can be all or part of the batch total, when entering multiple checks.
-
-
Under Payment Options:
-
Enter a Check/Ref No.
-
Apply As: Cash (automatically populates)
-
Type: TB- Take Back (automatically populates)
-
Amount: The amount of the payment.
-
This must be a negative value.
-
-
Under Invoice Filters:
-
The Include Paid checkbox is selected by default and not editable. Only invoices that have been paid display. Payments and takebacks cannot be entered at the same time.
-
-
Under Active Records:
-
The Include Paid checkbox is selected by default and not editable. Only invoices that have been paid display. Payments and takebacks cannot be entered at the same time.
-
In this example a batch is created, and a $1000 takeback entered in Payment Options to be distributed. Four hundred dollar takebacks were entered in the Post column. Note that the Batch Balance and Remaining amounts are reduced to $600 and the line-item balance changes to $200. The takebacks also appear in the Current Queue section.

When posting payments/batch payment, it may be necessary to write off a remaining balance. Users can post a payment for an invoice or line item and write off the unpaid balance. To do this, check the Write Off Balance box in the Payment Options section.
Perform the same actions as in the Posting Payments/Batches section with the following exceptions:
Under Payment Options:
-
Enter a Check/Ref No.
-
Apply As: Cash (automatically populates)
-
Amount: The amount of the payment.
-
The total of all payments in the batch must match the amount in the Batch Total in the Batch Options section. The Amount in Payment Options can be all or part of the batch total, when entering multiple checks.
-
Write Off Balance: select this check box.
Under Active Records:
Enter a payment in the Post field. The negative amount displayed in the Remaining field in Payment Options is the amount written off.
The write-off amount does not display in the Adjustment field or the Current Queue section.
In this example, the user makes a $1000.00 payment on an invoice and writes off the balance. The user creates the batch and enters a $1000 payment in the Payment Options section, then checks the Write Off Balance box. The user enters the payment in the Post column and select Write off balance action button. The payment is applied, the balance is written off, the payment displays in the Post column and the written off balance displays in the Adjustment column.
In this example, the user makes a $1000.00 payment on an invoice and writes off the balance. The user creates the batch and enters a $1000 payment in the Payment Options section, then checks the Write Off Balance box. The user enters the payment in the Post column. The payment is applied, and the balance is written off, and the entire balance of the invoice displays in the Post column. Once the payment and write off are applied, the remaining balance of the payment shows a negative number that reflects the balance of the invoice that is written off.


Some Payers provide overhead payments in addition to the balances billed for services. Amounts and frequency vary by Payer. Typically, Payers include overhead payments in their remittances.
A payment code must be set up to use this feature and identify overhead payments. Users with the correct security permissions can do this from the Value Items: Payment Codes page under Admin > Value Items > Billing (Payment Codes.
Perform the same actions as in the Posting Payments/Batches section with the following exceptions:
Under Active Records:
-
Post overhead payments for individual invoice line items using the Post field.
-
Then, enter the overhead payment in the Adjustment field and select overhead payment code in the Type field.
The overhead payment code’s name (Type) and the overhead amount will vary.
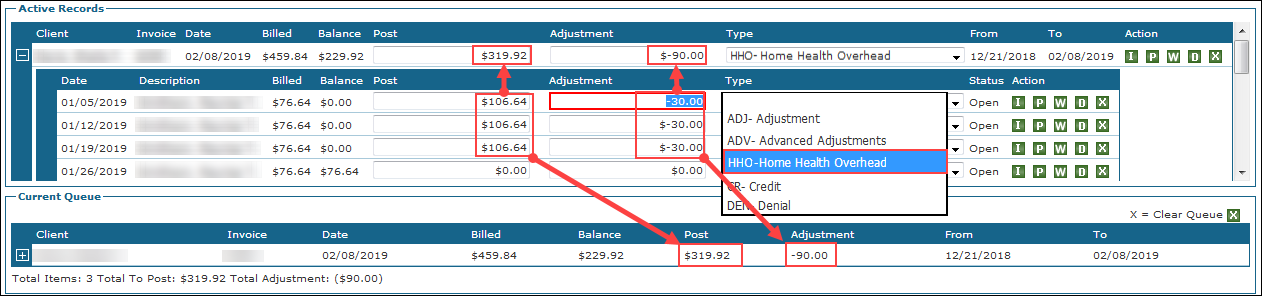
In this example, the Provider receives an extra $30 per visit for overhead. In the Post column, the user enters the payments plus the overhead for each line item. The user then enters $-30 in the Adjustment field and selects HHO- Home Health Overhead in the Type field. The balance for the invoice becomes $0. The $-30 adjustment displays in both the Active Records and Current Queue sections.
Fields located in the Batch Options section of the Manual Remittance window can be edited after the Create Batch button is clicked. Select the Edit Batch button to change the fields and Save to commit any changes. Select the Cancel button to discard changes.
Once a check has been applied, using the Payment Options section, the Apply As field can no longer be changed.

Select Save, on the menu bar, to save a posting session that is in progress and continue posting payments later. The user cannot begin a new posting session until the saved one is completed or deleted.
The saved batch can only be accessed by the user that created it.


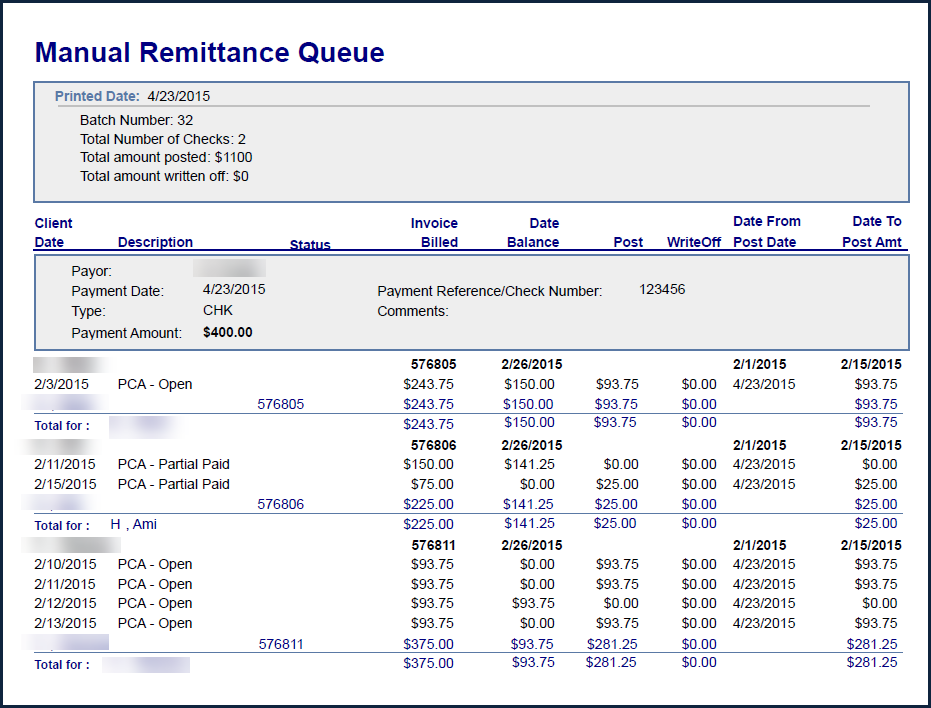
Press Preview on the menu bar to display the Manual Remittance Queue report. The report reflects all posted payments grouped by Payor and then by check. The batch number and auto generated Batch ID are included in the report and are useful when cross referencing reports. Denied items appear on this report with a paid amount of zero.

To perform a write off from the Manual Remittance window:
-
Go to the Manual Remittance window under Billing > Manual Remittance.
-
Use the Batch Option filters to prepare the batch.
-
Select the Create Batch button.

-
Use the Invoice filters to locate the invoice needing the adjustment.
-
Enter the adjustment amount.
-
Select the W icon (
 ) or select WO – Write Off from the Type dropdown menu.
The write off is added to the Current Queue section.

-
Select WO – Write Off in the Type dropdown menu.
-
Select the Write Off Balance checkbox.
-
Enter a check / reference number for the write off.

-
Select the Save button.

-
Select the OKbutton.

-
Select Post Now.

-
Select the OK button.

-
Select the OK button to run the Manual Remittance Queue Report.
Select the Cancel button. to skip the report.
The write-off is completed. The invoice status is changed to 07 – Bill Paid and the write off is displayed in the Payments & Credits tab.
