Sandata Agency Management 03-Invoice Details Window
An invoice contains the relevant information needed to bill a Client. To view the invoice details screen, double click an invoice under Main Menu > Billing > Invoices.


The title bar displays the invoice number on the left. The Print button will launch the invoice in PDF format, where you can then print the invoice. Invoice Numbers are set by the agency during implementation.

The General section of the invoice displays the Client name, Payor, Rate Plan and a Comment field for the invoice.
The Client, Payor, or Rate Plan information is read only and generated automatically when the invoice is created.

|
Field |
Description |
|---|---|
|
Client |
Displays the Client’s name. |
|
Payor |
Displays the Client’s Payor. |
|
Rate Plan |
Displays the rate plan associated with the Client. |
|
Comment |
Displays any comments attached the invoice. |
The Reference Codes section displays identification numbers. These fields auto-populate if the associated data is available, but they can also be edited.

|
Field |
Description |
|---|---|
|
Authorization Number |
Use this field to enter a Client’s authorization number. This field automatically displays the authorization number associated with Invoice. |
|
Billing Code |
This field displays the Billing Code associated with the Payer but can be edited. |
|
Reference Number |
Use this field to enter the Client’s (or Payer’s for the Client’s) reference number |
|
CS Code |
Use this field to enter the claim status code. |
The Dates and Status section displays information pertaining to the period that the invoice covers. The categories available in the Status field are dependent upon the invoice type (Traditional or Episodic).

|
Field |
Description |
|---|---|
|
Covers |
Displays the date range for which the invoice line items included occurred. |
|
Dated |
Use this field to select a date for the invoice to be dated as. |
|
Due By |
Use this field to select a date payment is due on. |
|
Status |
Use this field to select a status for the invoice. |
|
Original Amount |
Displays the invoice’s original billed amount. |
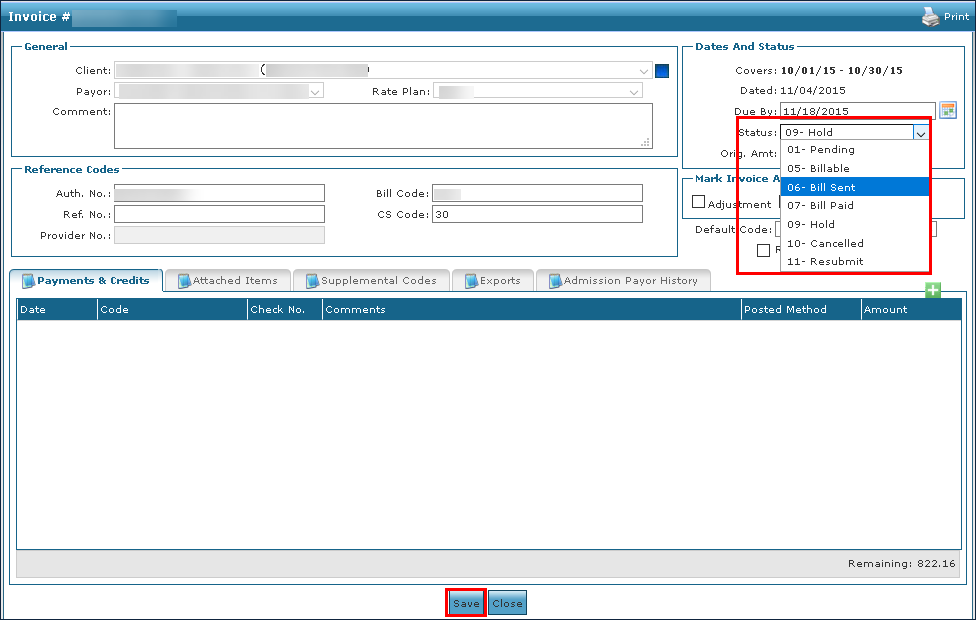
Most billing invoice item statuses update automatically but can be manually edited as needed. An invoice item's status can be set by selecting an option from the Status dropdown field.
Invoice Item status names can be edited by the agency from the Value Items screen, although the number and description remain the same.
|
Field |
Description |
|---|---|
|
01- Open |
This is the default status of a new invoice and indicates that the invoice has not been paid. |
|
02- Partial Paid |
This status is automatically set if the invoice has been partially paid. |
|
03- Paid |
This status is automatically set if the invoice has been paid in full and the Billed amount matches the Paid amount. |
|
08- Denied |
The whole invoice has been denied by the payer. |
|
09-Adjust |
Only set this status for Traditional/Commercial Billing. This status can be manually applied to an invoice with the status of "Paid" or "Partial Paid". The Invoice status must then be set to "Resubmit". When the adjusted invoice is electronically re-exported, the bill code will reflect the "Adjustment" for that invoice. |
|
10-Void |
Only set this status for Traditional/Commercial Billing. This status can be manually applied to an Invoice Item with the status of "Paid" or "Partial Paid" The Invoice status must then be set to "Resubmit". When the adjusted invoice is electronically re-exported, the bill code will reflect the "Void" for that item. |
|
11-Cancelled |
This status is automatically set when the invoice is cancelled. |
The Mark Invoice As section allows invoices to be marked as an Adjustment, Late Charge, or Void.

|
Field |
Description |
|---|---|
|
Adjustment |
Select this checkbox to mark the invoice as an adjusted amount. |
|
Late Charges |
Select this checkbox to mark the invoice as additional late charges. |
|
Void |
Select this checkbox to mark the invoice as void. |
The Payments and Credits tab displays any payments or adjustments made towards the total invoice. The Remaining field indicates the remaining balance that has not been paid.

|
Field |
Description |
|---|---|
|
Date |
Displays the date of the payment or adjustment. |
|
Code |
Displays the code associated with the payment type. |
|
Reference Number |
Displays the reference number for the payment or adjustment, if available. |
|
Comments |
Displays any comments associated with the payment or adjustment. |
|
Amount |
Displays the amount of the payment or adjustment. |
The Attached Items tab displays all billed items for the period that an invoice covers, as well as other billable items such as supplies.

|
Field |
Description |
|---|---|
|
Hide Voided Payments |
Select this checkbox to hide any payments marked void. |
|
Date |
Displays the date of the visit. |
|
Description |
Displays the description of the billed item or staff member depending on Payor set-up. |
|
POS |
Displays the place of service number. |
|
TOS |
Displays the type of service number. |
|
RevCode |
Displays the revenue code number. |
|
HCPCS |
Displays the healthcare common procedure coding system number. |
|
Modifiers |
Displays any modifiers applied to the billed item. Multiple modifiers can be entered separated with a semicolon (;). |
|
Quantity |
Displays the amount being billed in hours/visits/units. |
|
Billed |
Displays the amount being billed in dollars. |
|
Payment / Adjustment |
Displays the total payment / adjustments applied towards the attached item. |
|
Reason |
Displays any reason code attached to the item. |
|
Status |
Displays the status of the item. |
|
Reference Number |
Displays the reference number for an item if available. |
|
ICN |
Displays the internal control number associated with the item. |
|
Refresh |
Click this button to refresh the items. |
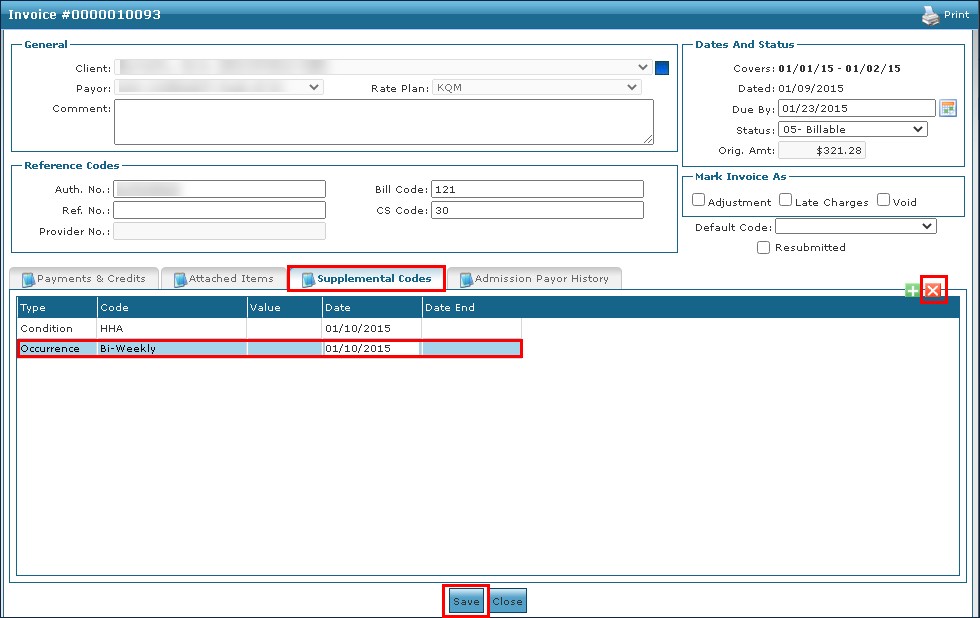
The Supplemental Codes tab displays additional billable items.

|
Field |
Description |
|---|---|
|
Type |
Displays the type of supplemental code. |
|
Code |
Displays the supplemental code affiliated with the item. |
|
Value |
Displays the value amount of the additional item. |
|
Date |
Displays the date the item was added. |
|
Date End |
Displays the ending date for an item. |
The Exports tab displays all exported files that include this invoice, in descending date order.

|
Field |
Description |
|---|---|
|
Export Date |
Displays the date the invoice was exported. |
|
File Name |
Displays the name of the exported file. |
|
Record Count |
Displays the number of invoices included in the export. |
|
Amount |
Displays the total dollar amount of all invoices included in the export. |
The Admission Payor History tab displays all payer related billing information associated with the invoice.

|
Field |
Description |
|---|---|
|
Payor |
Displays the name of the Payor associated with the invoice. |
|
Rate Plan |
Displays the rate plan used for the invoice. |
|
Rank |
Displays the payer’s ranking on the client’s health record. |
|
Customer Number |
Displays the Client’s customer number. |
|
MedicaidID |
Displays the Client’s MedicaidID. |
|
Group Number |
Displays the Client’s group number. |
|
Referral Number |
Displays the Client’s referral number. |
|
Send Bill To |
Displays the bill recipient. |
|
Responsible for Copay |
Select this checkbox to indicate if the Client is responsible for the copay. |
|
MSP Type |
Displays the Medicare Secondary Payer type. |
When performing an adjustment or edit, it may be necessary to alter the status of an invoice.
-
Locate the invoice under Main Menu > Billing > Invoices.
-
Select the Status dropdown.
-
Select the new status.
-
Select the Save button.
When processing or making an adjustment, it may be necessary to add a supplemental code to an invoice.
-
Go to the Invoices window under Main Menu > Billing > Invoices.
-
Use the filters to locate the selected invoice.
-
Double click to open the invoice.

-
Select the Supplemental Codes tab.
-
Select the Add icon (
 ) to add a Supplemental Code line.
 -
Enter the necessary information.
-
Select the Save button.

When processing or making an adjustment, it may be necessary to delete a supplemental code attached to an invoice.
-
Go to the Invoices window under Main Menu > Billing > Invoices.
-
Use the filters to locate the selected invoice.
-
Double click to open the invoice.
-
Select the Supplemental Codes tab.
-
Select the item to be deleted.
-
Select the Delete icon (
 ).
). -
Select the Save button.
The Payment window displays the fields necessary to post, correct, or make an adjustment to a payment, for a visit to resolve an invoice. The Payment screen is divided into three parts, General, Invoice Items, and Payment Stats.
To access the Payment window, open an invoice and double click a payment in the Payments & Credits tab under Main Menu > Billing > Invoices > Invoice > Payments & Credits).


The General section displays all editable information relating to the payment.

|
Field |
Description |
|---|---|
|
Dated |
Use this field to select a date that the payment was posted. |
|
Apply As |
Use this field to categorize the payment. |
|
Type |
Use this field to select the actual type of payment. |
|
Comment |
Use this field to include any comments about the payment. |
|
Check / Reference Number |
Use this field to indicate an associated check number or reference number with the payment. |
|
Amount |
Use this field to indicate the payment amount. |
|
Auto Post Remainder |
Use this button to automatically post payment to invoiced items in date order until amount is exhausted. |
|
Payment Adjustment |
Use this button to make any necessary adjustments to the payment. |
The Payment Stats section displays information relating to when and how the payment was posted.

|
Field |
Description |
|---|---|
|
Payment Balance |
Displays the remaining balance as the payment amount is distributed to each invoice item. |
|
Date Entered |
Displays the date the payment was posted. |
|
Entered By |
Displays the name of the Staff Member who posted the payment. |
|
Payment Voided |
Displays if the payment has been voided. |
|
Posted Method |
Displays the method used to post the payment. |
The Invoice Items section displays information about the staff members or service description associated with the invoice.

|
Field |
Description |
|---|---|
|
Date |
Displays the date the visit occurred. |
|
Description |
Displays the name of the staff or service associated with the visit. |
|
Billed |
Displays the amount billed for the visit. |
|
Balance |
Displays the remaining balance on the invoiced visit. |
|
Status |
Displays the current billing status of the invoiced visit. |
|
Posted |
Displays the payment amount posted towards the invoiced visit. |
When using Manual Remittance, once payment has been received for a billed invoice, it must be added to the invoice and distributed to the appropriate visits.
-
Locate and open the invoice under Main Menu > Billing > Invoices.

-
Select the Add (
) icon on the Payments & Credits tab.
-
Enter all applicable information.
-
Apply your payment:
-
Select Auto Post Reminder, to distribute the amount posted to invoice items, in date order, until the amount that was entered is exhausted, or
-
Enter the amount that will be applied to each invoice item manually, using the Posted field column.
-
-
Select the Post button.

-
Select the Save button to confirm this payment.
The applied Payment Line appears on the Invoice Detail window with the remaining balance amount adjusted.

Occasionally incorrect information is entered on a payment due to incorrect data entry, typos, or other errors that occur during processing. To correct an issue with a payment, it must first be voided before corrections can be made.
To void a payment:
-
Locate and open the invoice that needs correcting.
-
Double click on the payment with the incorrect information.
The Payment Window displays.

-
Select Payment Adjustment.

The Payment Adjustment window displays.
-
Enter the date for the payment to be voided.
-
Select Void.
-
Select the Ok button.

-
Select the Ok button.
A new line item showing the voided amount displays on the invoice as a negative amount.


When a service line should not have been billed or was billed incorrectly and must be sent as a corrected claim, these services can be voided on the invoice and sent as an adjustment transaction.
This feature will allow individual service lines that are in Bill Sent or Bill Paid Status to be voided without requiring the payment to be removed and reposted. This feature is currently limited to non-x12 837 claim formats.
To void individual line items on a previously billed invoice:
-
Search for and open the desired invoice under Billing > Invoices.

-
Select the Attached Items tab.

-
Use the dropdown menu to change the status of all applicable line items to Void.

-
Select the corresponding checkbox to release the visit(s) back to the Confirmed status if further action is needed to correct, cancel, or adjust the schedule.
If no further action is required, leaving the checkbox unselected will not return the schedule to billing review but will void the service line from the invoice.
If the invoice was previously in a Bill Paid status, voiding line items without removing the payment will return the invoice to a Bill Sent status when the changes are saved. Invoices in a Bill Paid status cannot be manually changed to Resubmit or Bill Sent status when a line item is not voided.
If the line item has been paid, make note of the ICN for the released schedules; this is needed for sending corrected invoices for processing as a resubmitted claim through the third-party interface.

-
Change the invoice Status to 11-Resubmit.
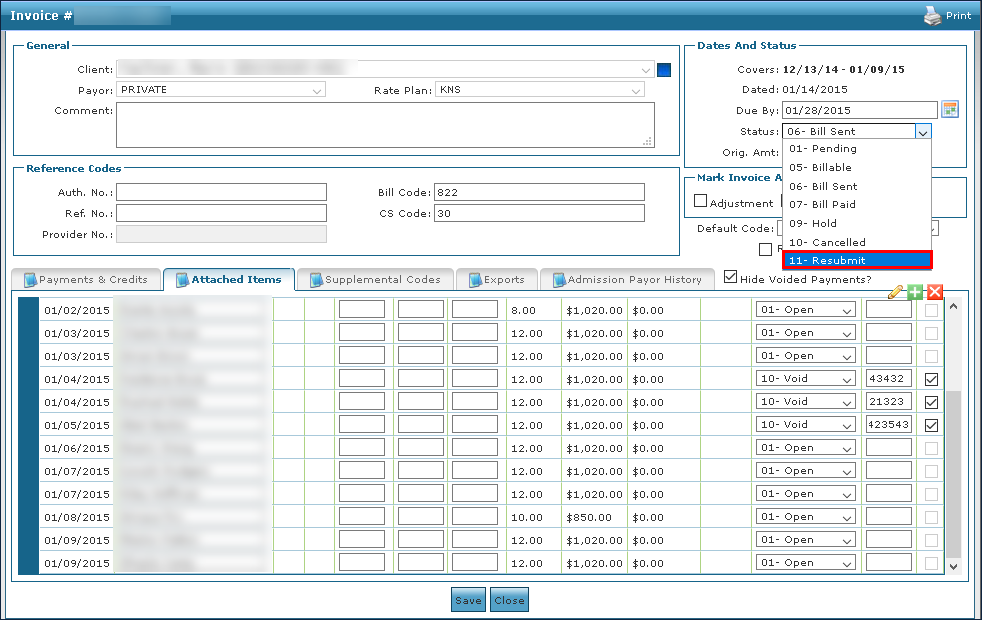
-
Select the Save button.

The void adjustment displays on the Payments and Credits tab. It will display the date the void was performed, the date the visit was performed, the void amount, and the adjusted remaining balance on the invoice.

-
Re-export the updated invoice from the Export window for any remaining services that were not voided under Billing > Exports.
-
Make any required adjustments or changes for the applicable released visits.
-
Generate a new invoice for the voided visits from the Billing Review window.
-
Add the ICN number from the previous invoice to the newly generated invoice, if applicable.
-
Change the status of the new invoice to 11 – Resubmit to send the new invoice as a correction for the previously voided service lines.
The ICN must be added and invoice status must be changed to Resubmit for these corrected invoices to be processed via a third-party interface as an adjustment transaction. If either is missing, the file will not be processed as an adjustment and may result in rejection.

-
-
Export the invoice with the corrected visits from the Billing Export window under Billing > Export.
-
The invoice Status should be 11 – Resubmit.
To transfer a balance, the Client must have more than one Payer and they must be correctly ranked.
To transfer an invoice balance from a Client's Traditional/Commercial Payer to another Traditional/Commercial Payer or to another "Episodic" payer, complete the following steps:
-
Locate and open the invoice with the balance to be transferred.
-
Select Transfer.
-
Select the Payer to transfer the balance to.

-
Select the invoice line items to be transferred. By default, all invoice line items are deselected.
-
Select the Transfer button.

-
Click Yes.

-
Select the Save button.
The original invoice detail window updates with the invoice status of 07-Bill Paid. If the entire balance was transferred. Otherwise, the status remains the same. At the Payments & Credits tab, a line item has now been added. The line item includes the transfer code and a comment listing the invoice number created for the transfer.

At the Invoices window, the newly created invoice is now listed with the transferred balance. The date of the invoice is the date the user completed the transfer.

In some situations it may be easier to void an entire invoice rather than voiding individual payments or line items.
To void an invoice:
-
Locate the invoice under Main Menu > Billing > Invoices.
-
Change the status to 10 - Cancelled.
The Payment Adjustment box window opens.


-
Select the payment adjustment type or click the Void radio button.
-
Select a cancel date.
-
Select the Void checkbox.
-
Select the Save button.
The invoice is voided.
