Sandata Agency Management 02-Company Window

The Company window displays all information and settings about a company associated with the agency.

The General tab on the Company window displays the basic information about a company such as tax details, the physical address, and contact information.

The General section on the General tab of the Company window displays basic information about the company.

|
Field |
Description |
|---|---|
|
ID |
Use this field to enter the company id. |
|
Name |
Use this field to enter the company name. |
|
Oasis ID |
Use this field to enter the company’s OASIS id. |
|
Tax ID |
Use this field to enter the company’s tax id. |
|
Submitter Prefix |
Use this field to enter the company’s submitter prefix. |
|
Taxonomy |
Use this field to enter the company’s taxonomy code. |
|
Main Loc |
Use this dropdown to select the company’s main location. |
|
This Company is Active |
Select this check box to indicate that the company is active. |
The Address/Phone Numbers section of the General tab on the Company window displays contact and physical office location information for the company.

|
Field |
Description |
|---|---|
|
Address |
Use this field to enter the company’s street address. |
|
City |
Use this field to enter the company’s city. |
|
State |
Use this field to enter the company’s state. |
|
Zip |
Use this field to enter the company’s zip code. The zip code should use the full 9 digits. |
|
Phone |
Use this field to enter the company’s phone number. |
|
Fax |
Use this field to enter the company’s fax number. |
|
Use as Remit Address |
Select this check box to use this address as the company’s remittance address. |
The Location section of the General tab on the Company window displays all office locations the company may have in an area.

|
Field |
Description |
|---|---|
|
Name |
Displays the name of the office location. |
If using electronic billing with the Service Facility Loop on the EDI tab, the location must be unique for each, using the second address line to specify each location. If using SPOC, the location name must be the legal name of the agency to pull the doctor’s orders.
To add a new location to a company:
-
Go to the General tab on the Companies window under Main Menu > Admin > System Setup > Companies > General.
-
Select the Add icon to add a location.

-
Select the location to be added.
-
Select the Save button.

To remove an invalid or no longer used location:
-
Go to the General tab on the Companies window under Main Menu > Admin > System Setup > Companies > General.
-
Select the location to be deleted.
-
Select the Delete icon to delete the location.

The Admission Types section of the General tab on the Company window displays the admission types accepted by the company.

|
Field |
Description |
|---|---|
|
Name |
Displays the name of the admission type. |
The General tab on the Company window displays the basic information about a company such as tax details, the physical address, and contact information.

The General section on the General tab of the Company window displays basic information about the company.

|
Field |
Description |
|---|---|
|
ID |
Use this field to enter the company id. |
|
Name |
Use this field to enter the company name. |
|
Oasis ID |
Use this field to enter the company’s OASIS id. |
|
Tax ID |
Use this field to enter the company’s tax id. |
|
Submitter Prefix |
Use this field to enter the company’s submitter prefix. |
|
Taxonomy |
Use this field to enter the company’s taxonomy code. |
|
Main Loc |
Use this dropdown to select the company’s main location. |
|
This Company is Active |
Select this check box to indicate that the company is active. |
The Address/Phone Numbers section of the General tab on the Company window displays contact and physical office location information for the company.

|
Field |
Description |
|---|---|
|
Address |
Use this field to enter the company’s street address. |
|
City |
Use this field to enter the company’s city. |
|
State |
Use this field to enter the company’s state. |
|
Zip |
Use this field to enter the company’s zip code. The zip code should use the full 9 digits. |
|
Phone |
Use this field to enter the company’s phone number. |
|
Fax |
Use this field to enter the company’s fax number. |
|
Use as Remit Address |
Select this check box to use this address as the company’s remittance address. |
The Location section of the General tab on the Company window displays all office locations the company may have in an area.

|
Field |
Description |
|---|---|
|
Name |
Displays the name of the office location. |
If using electronic billing with the Service Facility Loop on the EDI tab, the location must be unique for each, using the second address line to specify each location. If using SPOC, the location name must be the legal name of the agency to pull the Doctor’s orders.
To add a new location to a company:
-
Go to the General tab on the Companies window under Main Menu > Admin > System Setup > Companies > General.
-
Select the Add icon.

-
Select the location to be added.
-
Select the Save button.

To remove an invalid or no longer used location:
-
Go to the General tab on the Companies window under Main Menu > Admin > System Setup > Companies > General.
-
Select the location be deleted.
-
Select the Delete icon.

The Admission Types section of the General tab on the Company window displays the admission types accepted by the company.

|
Field |
Description |
|---|---|
|
Name |
Displays the name of the admission type. |
Only admission types in this list are available for the company. Admission types are not required, leaving this blank includes all admission types.
To add a new admission type:
-
Go to the General tab on the Companies window under Main Menu > Admin > System Setup > Companies > General.
-
Select the Add icon.

-
Select the new admission type.
-
Select the Save button.
To remove an invalid or out of date admission type:
-
Go to the General tab on the Companies window under Main Menu > Admin > System Setup > Companies > General.
-
Select the admission type to be removed.
-
Select the Delete icon.
-
Select the Save button.

The Shift tab on the Company window displays information about shift types, hours and days of the week as defined by the company. Shift groups are used when billing and/or payroll are different, based on time of day.

The Shift Information section of the Shift tab displays information about the company’s shift groups and which are currently active.

|
Field |
Description |
|---|---|
|
Shift Group |
Use this field to enter the name of the shift group. |
|
Active |
Select this checkbox to indicate that the shift group is active. |
|
Default |
Select this checkbox to indicate that this is the default company shift group. |
To add a new shift group to a company:
-
Go to the Shift tab on the Companies window under Main Menu > Admin > System Setup > Companies > Shift Group.
-
Select the Add icon.

-
Enter the name of the new shift.
-
Select the Ok button.

To remove an out of date or invalid shift group:
-
Go to the Shift tab of the shift group to be deleted on the Companies window under Main Menu > Admin > System Setup > Companies > Shift Group.
-
Select the Delete icon.

-
Select the Ok button.

The Shift Times section of the Shift tab displays the names and times of the shifts as established by the company.

|
Field |
Description |
|---|---|
|
Shift Name |
Use this field to select the shift name. |
|
Begin Time |
Use this field to enter the shift begin time. |
|
End Time |
Use this field to enter the shift end time. |
To add a new shift time:
-
Go to the desired Shift tab on the Companies window under Main Menu > Admin > System Setup > Companies > Shift Group.
-
Select the Add icon to add a shift.
-
Use the fields to enter the shift details.
-
Select the Save button.

To remove an invalid or out of date shift:
-
Go to the desired Shift tab on the Companies window under Main Menu > Admin > System Setup > Companies > Shift Group.
-
Select the shift to be removed.
-
Select the Delete icon to delete the shift.
-
Select the Save button.

The Weekend Information section of the Shift tab displays information about the company’s designated weekend days.

|
Field |
Description |
|---|---|
|
Start of Weekend |
Use this dropdown and field to select the start of weekend day and time. |
|
End of Weekend |
Use this dropdown and field to select the end of weekend day and time. |
The Travel tab on the Company window displays settings that are associated with the travel time task.

|
Field |
Description |
|---|---|
|
Travel Time Duration Trigger |
Use this field to enter the travel time duration trigger amount. |
|
Travel Time Max Periods |
Use this field to enter travel time maximum time periods. |
|
Travel Time Round To Nearest |
Use this dropdown to select how to round travel time. |
|
Car Fare Event Code |
Use this dropdown to select the car fare event code. |
The Numbers tab on the Company window displays the various identification numbers associated with the offices under a company and is dependent on specific clinical and billing requirements.
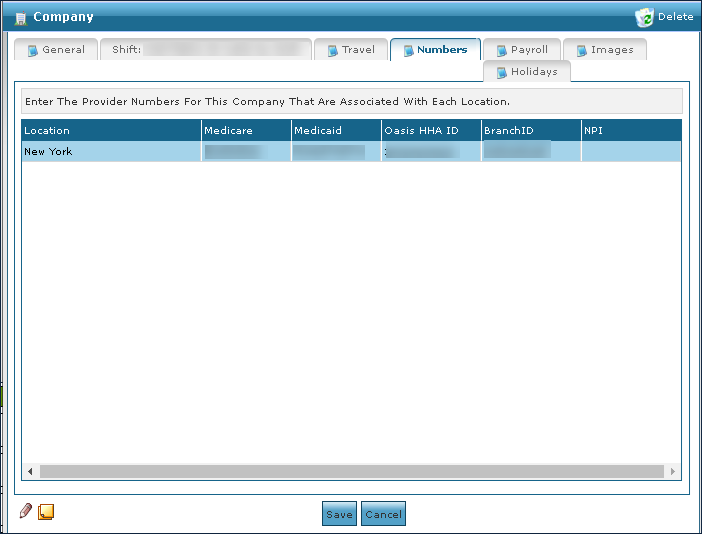
|
Field |
Description |
|---|---|
|
Location |
Use this field to select the location. |
|
Medicare |
Use this field to enter the Medicare number. |
|
Medicaid |
Use this field to enter the Medicaid number. |
|
Oasis HHA ID |
Use this field to enter the Oasis HHA identification number. |
|
BranchID |
Use this field to enter the branch identification number. |
|
NPI |
Use this field to enter the National Provider Identifier (NPI) number. |
The Payroll tab on the Company window displays the information and settings for doing payroll at a company. This includes pay rates, overtime rates, and export settings.

The Payroll Settings section on the Payroll tab displays basic information about payroll frequency, identification numbers and other settings.

|
Field |
Description |
|---|---|
|
Payroll Type |
Use this dropdown to select the payroll frequency. The weekly setting is used for weekly and bi-weekly payroll cycles. |
|
Wk Begins |
Use this dropdown to select when the pay week begins. This option requires using 12:00 AM as the official start of day. |
|
Payroll ID |
Use this field to enter the payroll id number. |
|
Count Holidays first when calculating for overtime |
Select this check box to include holiday hours prior to calculating overtime. |
The Payroll Base section on the Payroll tab displays rate information and salary cap details that are calculated when doing payroll.

|
Field |
Description |
|---|---|
|
Multiplier |
Use this field to enter the overtime multiplier. |
|
Base Rate |
Use this field to enter the rate to calculate overtime. This rate overrides the staff payroll rate when necessary. |
|
Weekly |
Use this field to enter the weekly hour amount. |
|
Overtime based on |
Use this dropdown to determine how overtime is calculated[DB1] .
|
|
OT Warn Only during a schedule creation and update. |
Select this checkbox to receive a warning that a staff member is entering overtime when creating or updating a schedule. |
The Other Information section on the Payroll tab displays holiday rate information and additional export settings. This is only used as a default in assisting with the holiday tab setup. This does not update any existing holiday information if changed after the holiday was setup.
The dropdown next to the Hourly Holiday and Visit Holiday rates can be used to increase the rates by either a dollar amount or a set multiplier.

|
Field |
Description |
|---|---|
|
Pay Holiday Rates |
Select this checkbox to enable holiday pay rates. |
|
Hourly Holiday |
Use this field to enter the hourly holiday amount pay rate. |
|
Visit Holiday |
Use this field to enter the visit holiday pay rate. |
|
Exclude Zero Items From P/R Export |
Select this checkbox to exclude $0 amounts from the payroll export. |
The Export Settings section on the Payroll tab displays the format used for exporting payroll. Choosing a format restricts access to only the selected format. Leaving the field blank allows access to all formats on the Payroll Review window.

|
Field |
Description |
|---|---|
|
Format |
Use this dropdown to select the payroll export format. |
The Images tab on the Company window displays any images associated with the company such as a logo or brand ID and are used for private pay invoices.

To add a new image:
-
Go to the Images tab on the Companies window under Main Menu > Admin > System Setup > Companies > Images.
-
Select the Add icon to add the new image.

-
Select the Choose File button.

-
Locate the file to be added.
-
Select the Open button.

-
Select the Save Image button.

-
Use the field to name the image, if needed.
-
Select the Save button.

To remove an invalid or out of date image:
-
Go to the Images tab on the Companies window under Main Menu > Admin > System Setup > Companies > Images.
-
Select the arrow to choose the image to be removed.
-
Select the Delete icon.
-
Select the Save button.

The Holidays tab on the Company window displays all holidays established by the company including their beginning and end times, pay amounts and more.

The Search Criteria section on the Holidays tab displays the search filters that can be used to locate a holiday.

|
Field |
Description |
|---|---|
|
Begin Date |
Use this field to filter for holidays beginning with this date. |
|
End Date |
Use this field to filter for holidays ending with this date. |
|
Filter Type |
Use this drop down to select the filter type. |
The Holidays section on the Holidays tab displays information about the different holidays that have been created in the system.

|
Field |
Description |
|---|---|
|
Holiday |
Use this field to enter the holiday name. |
|
Begin Date |
Use this field to enter the holiday beginning date. |
|
Begin Time |
Use this field to enter the holid``ay begin time. |
|
End Date |
Use this field to enter the holiday end date. |
|
End Time |
Use this field to enter the holiday end time. |
|
Pay |
Select this check box to indicate that this is a paid holiday. |
|
Global |
Select this check box to indicate that this is a holiday for the entire company. This automatically adds the holiday to all companies and locations. |
To add a new holiday or event:
-
Go to the Holidays tab on the Companies window under Main Menu > Admin > System Setup > Companies > Holidays.
-
Select the Add icon to add a new holiday.

-
Enter the holiday name.

-
Select the Ok button.
-
Complete the fields to enter the holiday information.
-
Select the Save button.

To remove an invalid or out of date hobby:
-
Go to the Holidays tab on the Companies window under Main Menu > Admin > System Setup > Companies > Holidays.
-
Select the holiday to be removed.
-
Select the Delete icon to delete the holiday.

-
Select the Yes button.
